(PRO) Dead Cells
In this tutorial, we will look into how to generate levels similar to what we can see in Dead Cells. We will use this tileset by Szadi art. - be sure to check out their work if you like the tileset.
Disclaimer: We are in no way affiliated with the authors of the Dead Cells game and this plugin is not used in the game. This is only a case study about how to use this plugin to create something similar to what is done in that game.

Note: All files from this example can be found at Edgar/Examples/DeadCells.
| Custom post-processing | A custom post-processing task is used to spawn enemies after a level is generated |
| Custom post-processing | Move the player to the spawn position of the level |
| Custom rooms | The definition of rooms is enhanced with a custom type |
Prerequisites#
To run the example, you need to:
- Add a layer called "StaticEnvironment"
- Enable "Auto Sync Transforms" in Physics2D settings
Introduction#
Dead Cells is a rogue-lite, Metroidvania inspired, action-platformer. They use procedural generation techniques to generate levels of the game. An article about their approach can be found here and a video here.
The main idea is that they have hand-made room templates and a graph that describes the structure of the level. Both the room templates and the graph are usually different for each stage of the game. Their procedural generator is then guided by the graph of rooms and picks a random room template for each room. This approach is very similar to what we do in our algorithm.
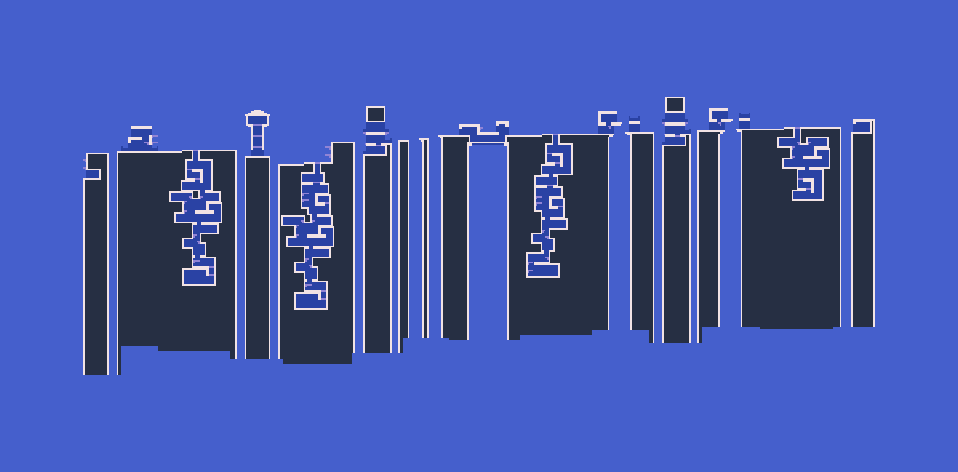
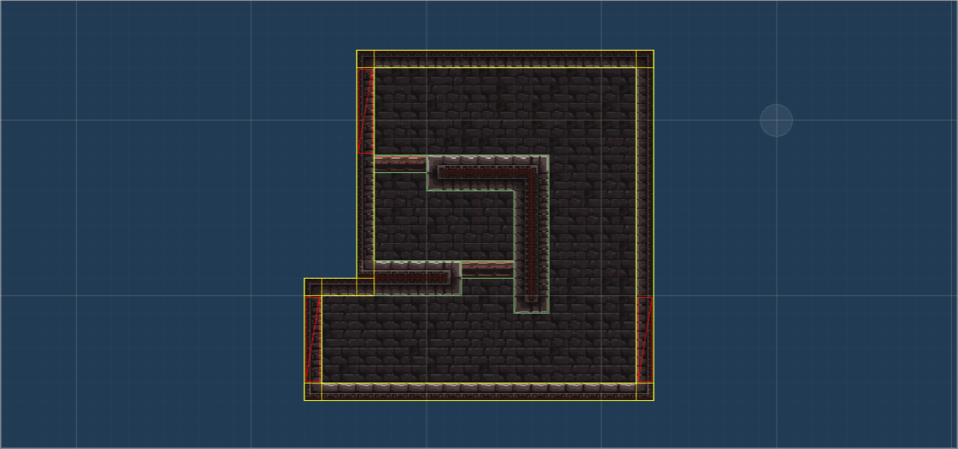
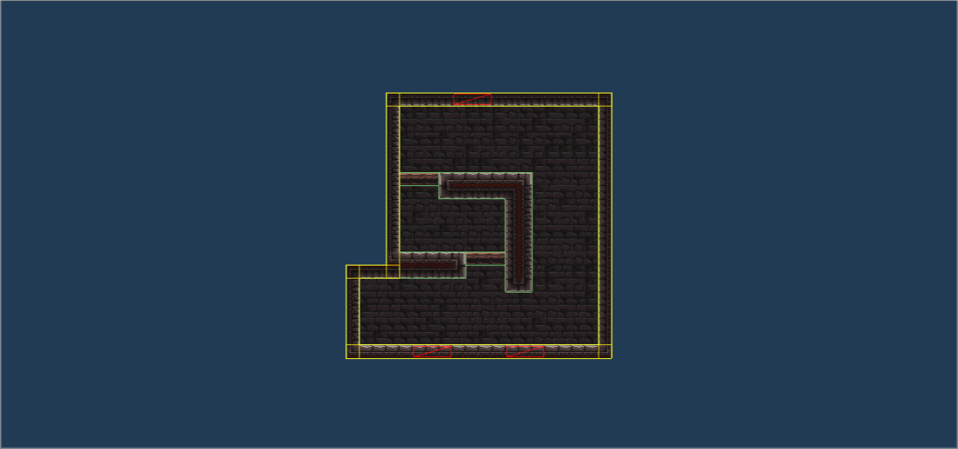
Underground level#
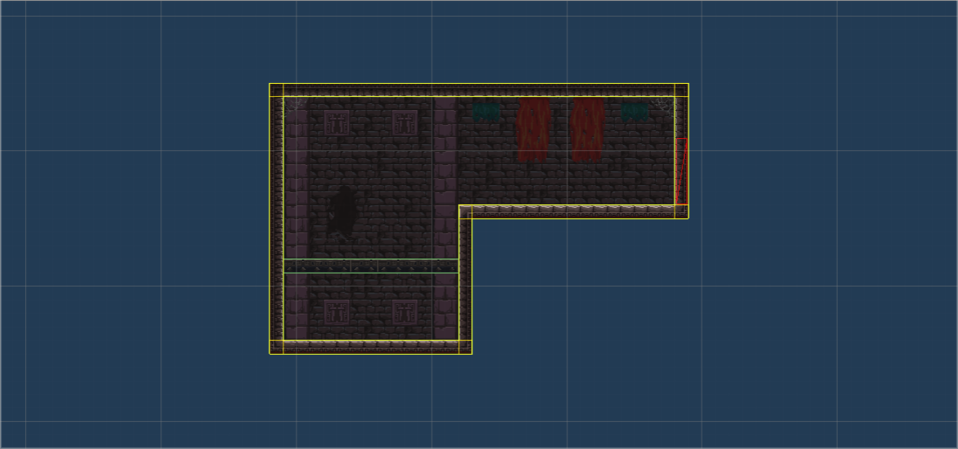
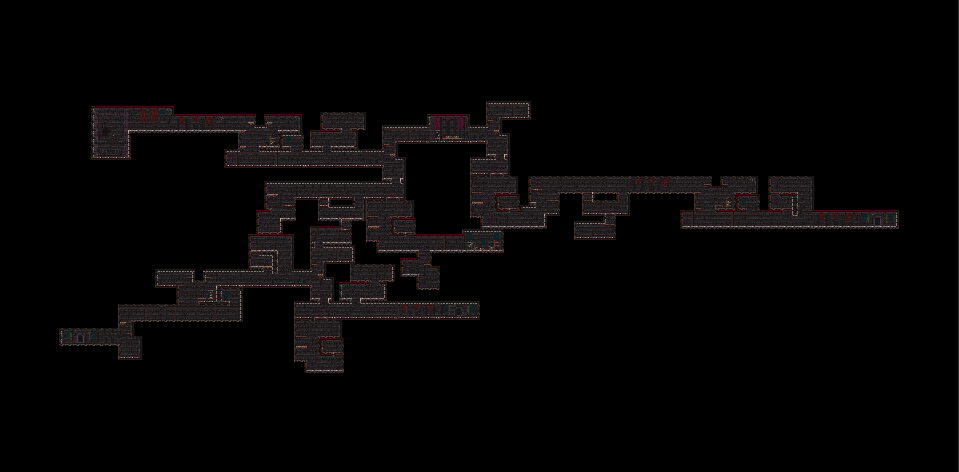
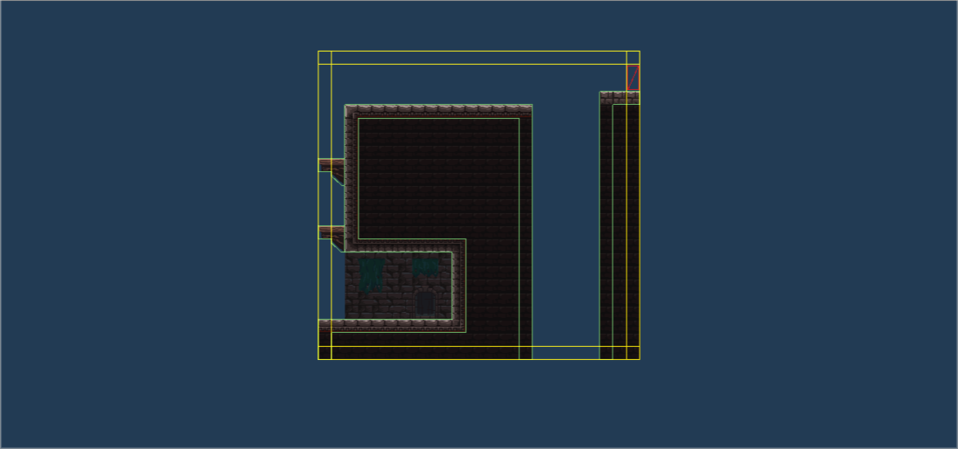
The first level that we will try to implement with our plugin is an underground level inspired by the Prisoners Quarters level from Dead Cells.
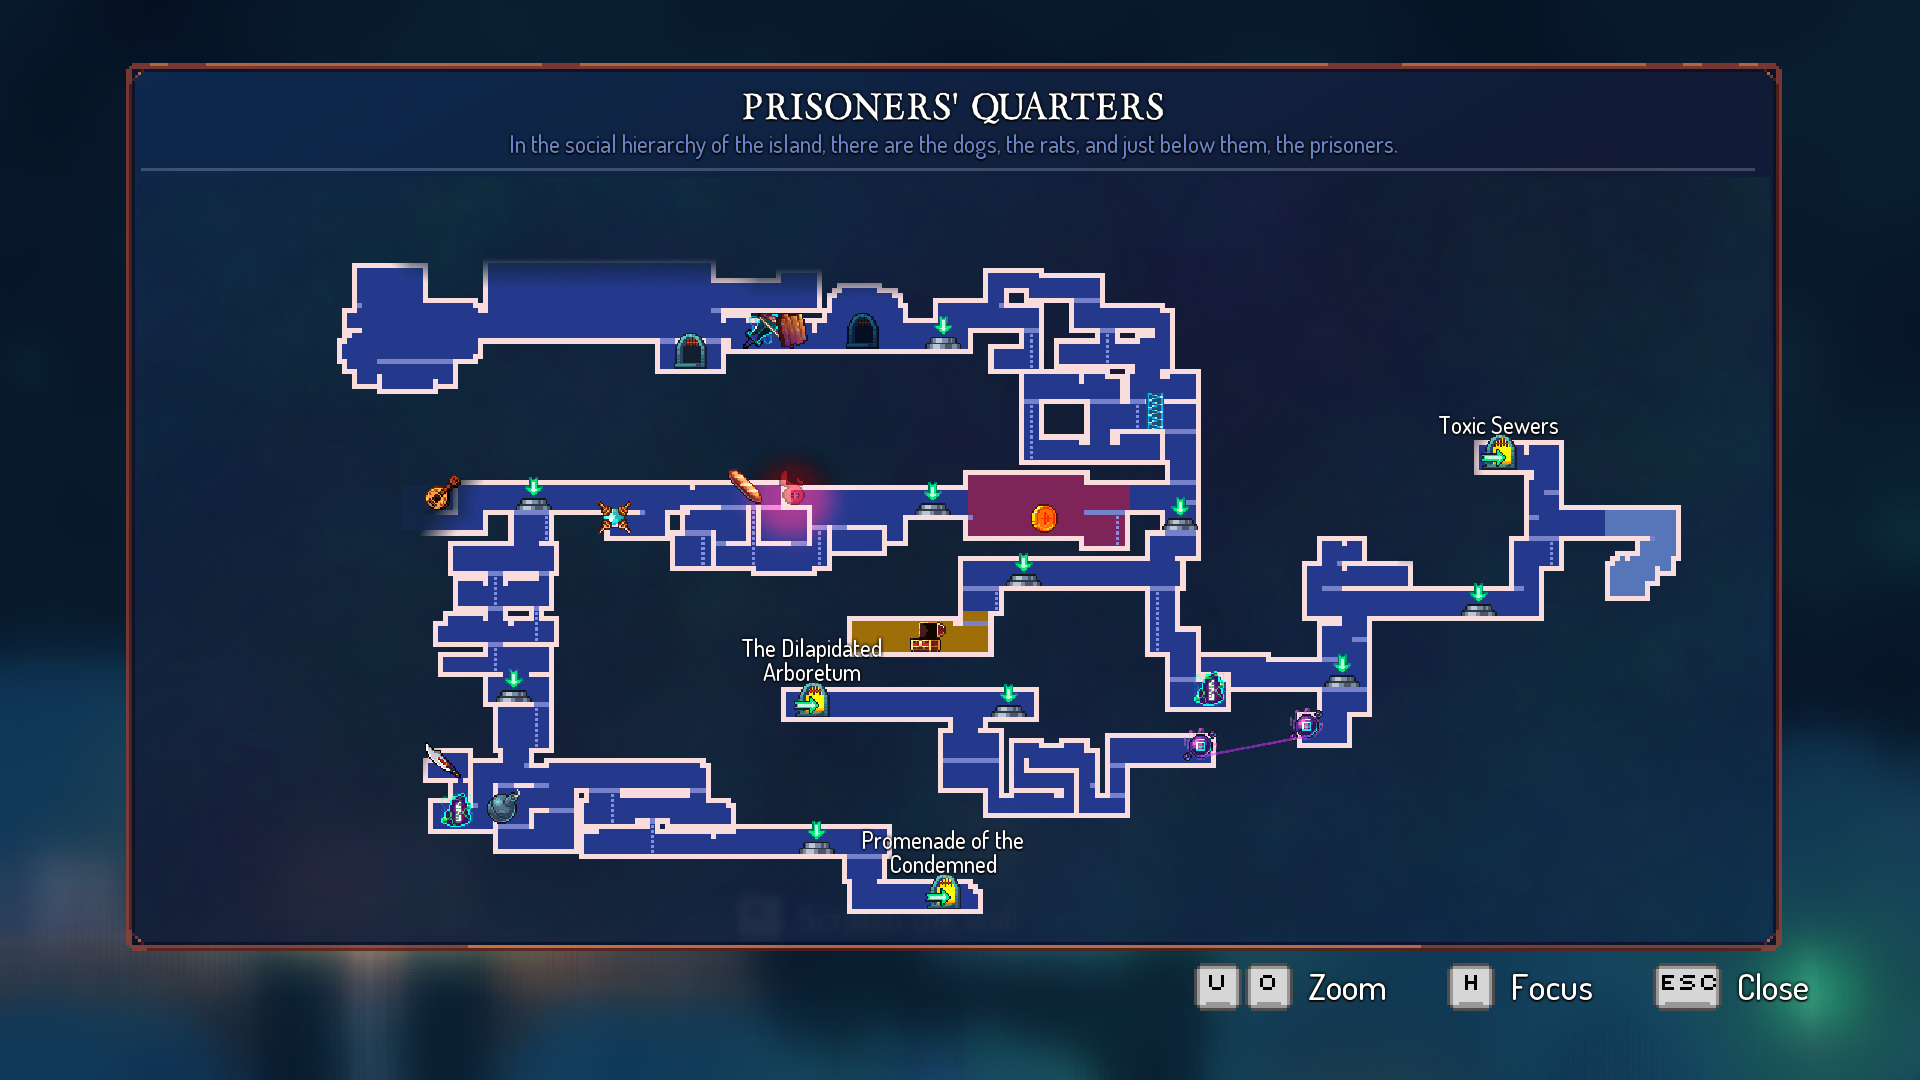
Room templates#
We use the default platformer tilemap layers handler to create the room templates.
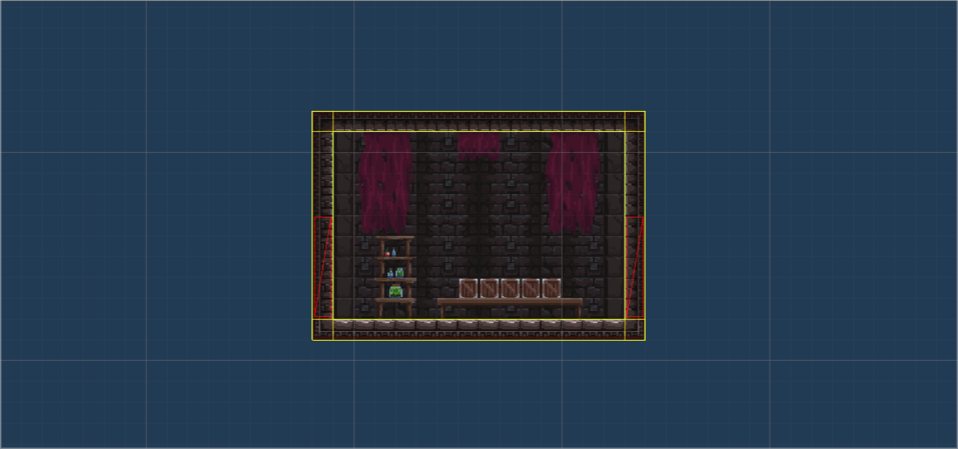
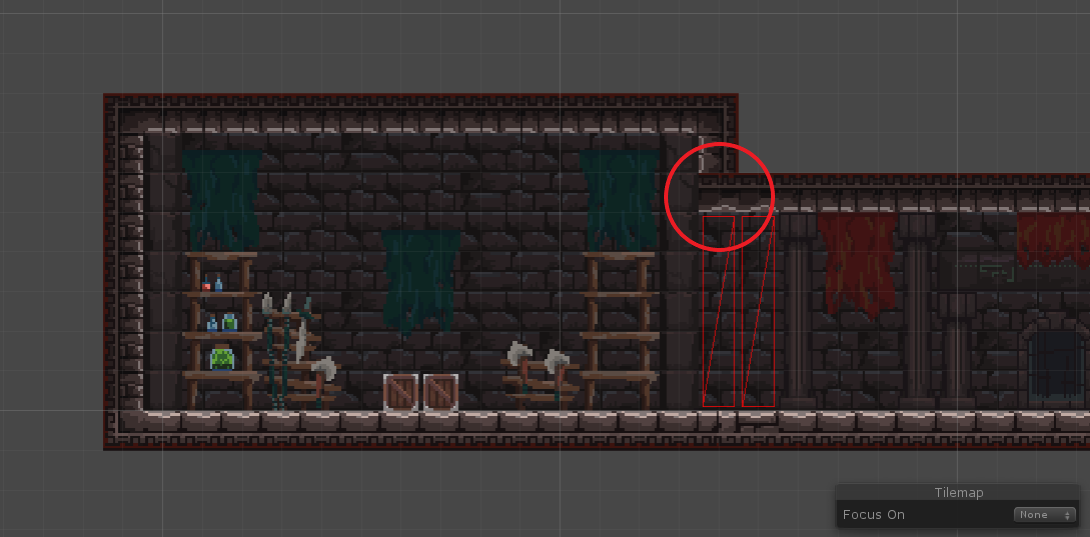
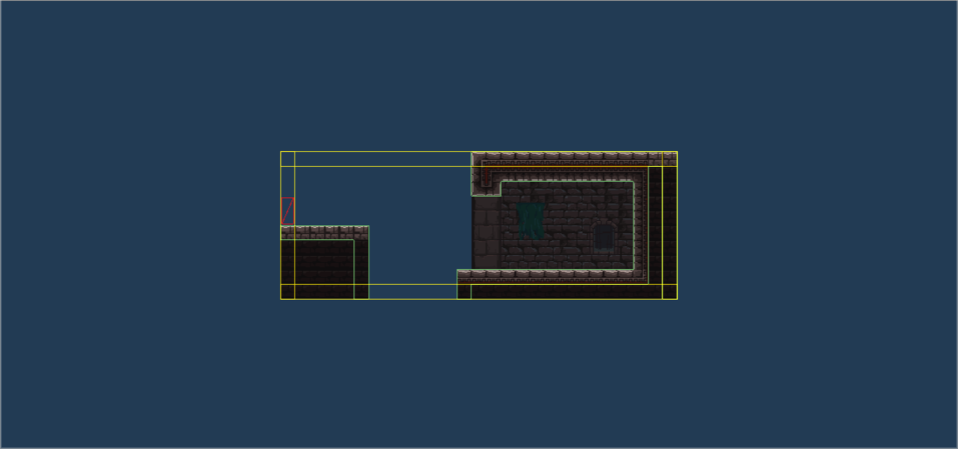
Corridors#
We use simple corridors to connect individual rooms.
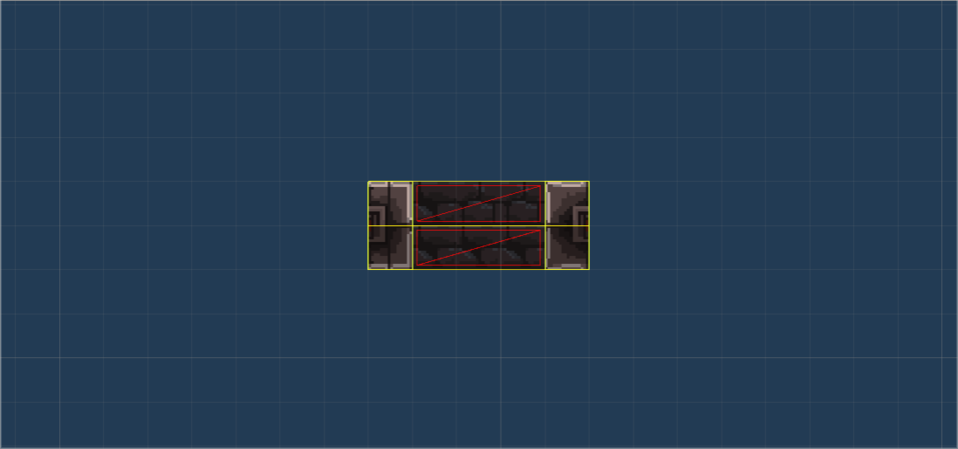
There is a slight problem with the corners of the corridor and the tileset that we use. In the image below, you can see that if the room that is connected with the corridor has a different height than the corridor, we should use a proper corner tile. We currently do not handle this situation but it could be solved by using rule tiles or by writing a post-processing logic that would find these problems and fix them.
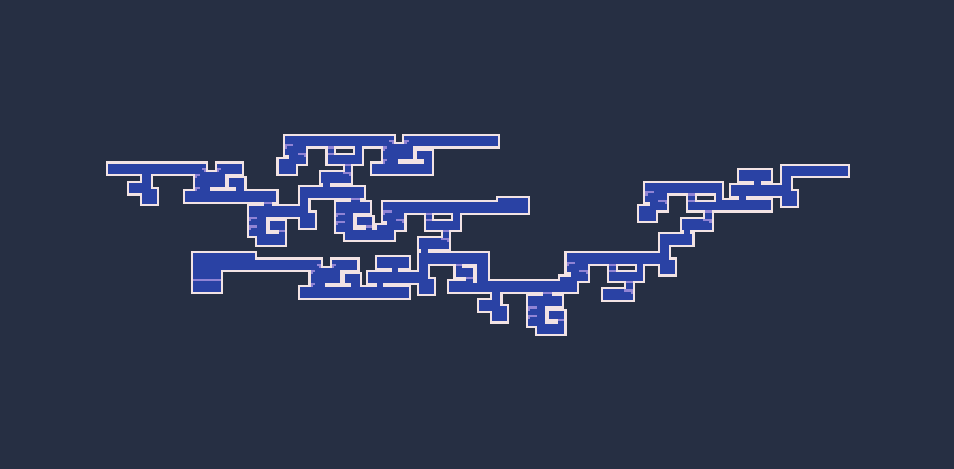
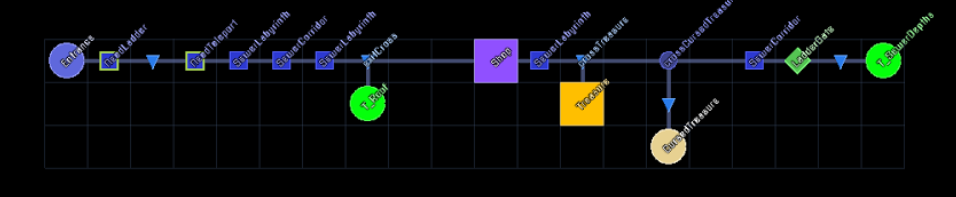
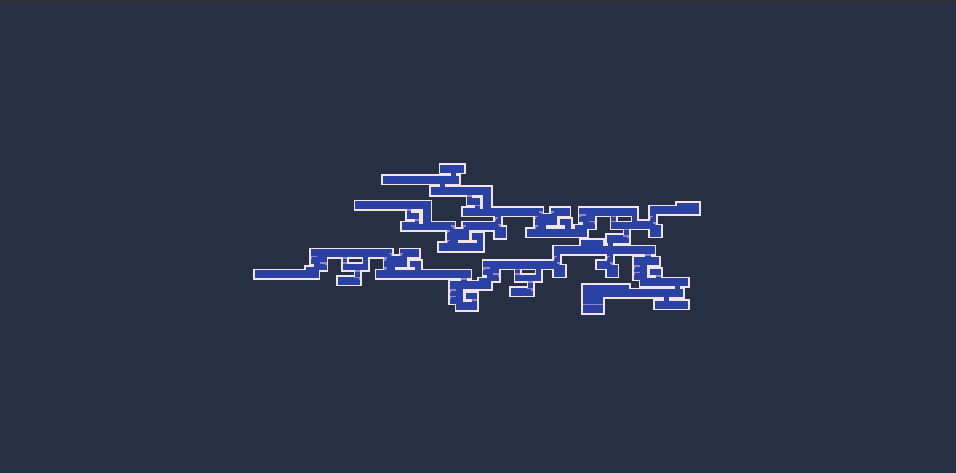
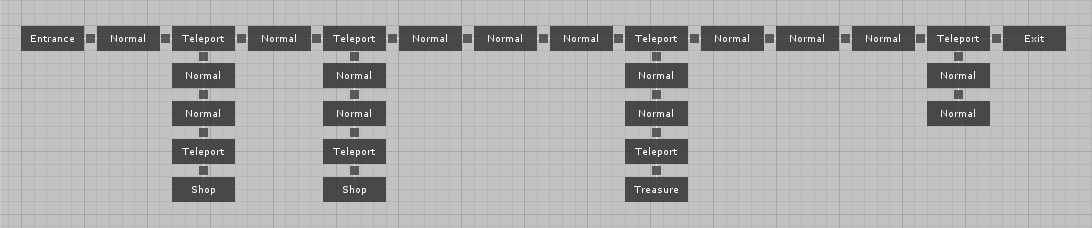
Level graph#
Our underground level is inspired by the Prisoners Quarters level in Dead Cells. The level graph below was created by analyzing the structure of several generated levels and then trying to replicate the main features.
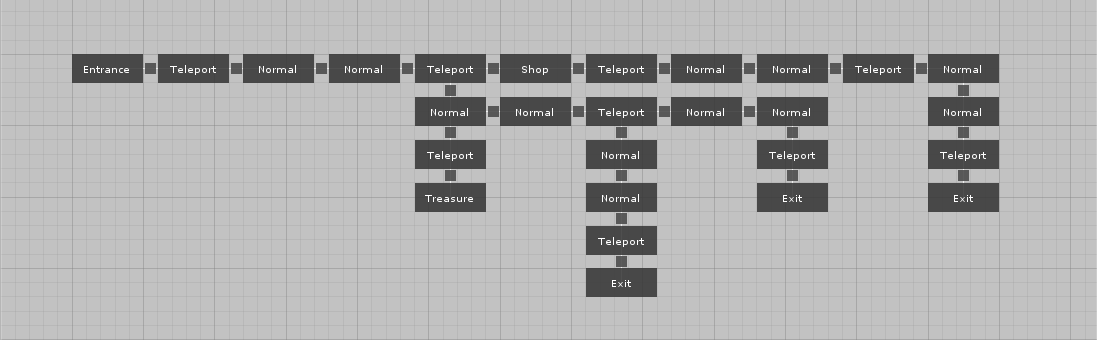
Note: It seems like the structure of the level may slightly differ between individual runs of the game. For example, the positions of the shop room and the treasure room may be swapped. However, to keep it simple, we will use a fixed level graph. You can see the Enter the Gungeon for an example of procedurally generated levels.
Custom room and connection types#
In the level graph above, we used custom room and connection types. The implementation of the custom room type can be seen below. Each room has its type (entrance, treasure, etc) and also a flag that indicates where it is outside (which is used for rooftop levels). Additionally, we override the ToString() implementation so that the type of room is displayed in the level graph.
public class DeadCellsRoom : RoomBase{public DeadCellsRoomType Type;public bool Outside;public override List<GameObject> GetRoomTemplates(){// We do not need any room templates here because they are resolved based on the type of the room.return null;}public override string GetDisplayName(){// Use the type of the room as its display name.return Type.ToString();}}
We also have a custom connection type. It currently looks exactly like the default implementation but we use it just in case we need some additional functionality later.
Input setup#
We decided to use a custom input setup to prepare our inputs. The main idea is the following. We create a level graph as we would normally do but we do not assign any room templates to it. Instead, we create a custom input task that takes a level graph as an input, together with the mapping between the type of room and the available room templates. The implementation will go through individual rooms in the level graph and based on their type it will assign corresponding room templates.
First, we create the mapping between the type of the room and the available room templates:
[Serializable]public class DeadCellsRoomTemplatesConfig{public GameObject[] DefaultRoomTemplates;public GameObject[] ShopRoomTemplates;// Additional room templates would be herepublic GameObject[] GetRoomTemplates(DeadCellsRoom room){switch (room.Type){case DeadCellsRoomType.Shop:return ShopRoomTemplates;default:return DefaultRoomTemplates;}}}
And then we create a simple input setup task that prepares the level description:
public class DeadCellsInputSetupTask : DungeonGeneratorInputBase{public LevelGraph LevelGraph;public DeadCellsRoomTemplatesConfig RoomTemplates;/// <summary>/// This is the main method of the input setup./// It prepares the description of the level for the procedural generator./// </summary>/// <returns></returns>protected override LevelDescription GetLevelDescription(){var levelDescription = new LevelDescription();// Go through individual rooms and add each room to the level description// Room templates are resolved based on their typeforeach (var room in LevelGraph.Rooms.Cast<DeadCellsRoom>()){levelDescription.AddRoom(room, RoomTemplates.GetRoomTemplates(room).ToList());}// Go through individual connections and for each connection create a corridor roomforeach (var connection in LevelGraph.Connections.Cast<DeadCellsConnection>()){var corridorRoom = ScriptableObject.CreateInstance<DeadCellsRoom>();corridorRoom.Type = DeadCellsRoomType.Corridor;levelDescription.AddCorridorConnection(connection, RoomTemplates.CorridorRoomTemplates.ToList(), corridorRoom);}return levelDescription;}}
Spawn position#
In Example 1, we placed the player prefab directly in the Spawn room template to make sure that the player always starts in the correct room. However, there is also a different approach to achieve the same result. Instead of placing the player prefab inside the room template, we simply create an empty GameObject that will act as a marker of the spawn position. We place the player prefab directly into the scene and implement a simple post-processing logic that finds the spawn position marker and moves the player there after the level is generated.
private void SetSpawnPosition(GeneratedLevel level){// Find the room with the Entrance typevar entranceRoomInstance = level.GetRoomInstances().FirstOrDefault(x => ((DeadCellsRoom) x.Room).Type == DeadCellsRoomType.Entrance);if (entranceRoomInstance == null){throw new InvalidOperationException("Could not find Entrance room");}var roomTemplateInstance = entranceRoomInstance.RoomTemplateInstance;// Find the spawn position markervar spawnPosition = roomTemplateInstance.transform.Find("SpawnPosition");// Move the player to the spawn positionvar player = GameObject.FindWithTag("Player");player.transform.position = spawnPosition.position;}
Enemies#
In order to spawn enemies in generated levels, we added an empty GameObject called EnemySpawnPositions to each room template where we want to spawn enemies. Each empty GameObject that we attach as a child will mark a single position where an enemy can spawn. An advantage of this approach is that we can randomize the process of choosing an enemy for each spawn point.
We did not implement any combat, just a simple patrol AI that makes the enemy change its direction if there is a hole or an obstacle ahead.
Below you can see a method that we can put inside a post-processing task to handle the spawn of enemies.
public bool SpawnEnemies;public GameObject[] Enemies;private void DoSpawnEnemies(GeneratedLevel level){// Check that we have at least one enemy to choose fromif (Enemies == null || Enemies.Length == 0){throw new InvalidOperationException("There must be at least one enemy prefab to spawn enemies");}// Go through individual roomsforeach (var roomInstance in level.GetRoomInstances()){var roomTemplate = roomInstance.RoomTemplateInstance;// Find the game object that holds all the spawn pointsvar enemySpawnPoints = roomTemplate.transform.Find("EnemySpawnPoints");if (enemySpawnPoints != null){// Go through individual spawn points and choose a random enemy to spawnforeach (Transform enemySpawnPoint in enemySpawnPoints){var enemyPrefab = Enemies[Random.Next(Enemies.Length)];var enemy = Instantiate(enemyPrefab);enemy.transform.parent = roomTemplate.transform;enemy.transform.position = enemySpawnPoint.position;}}}}
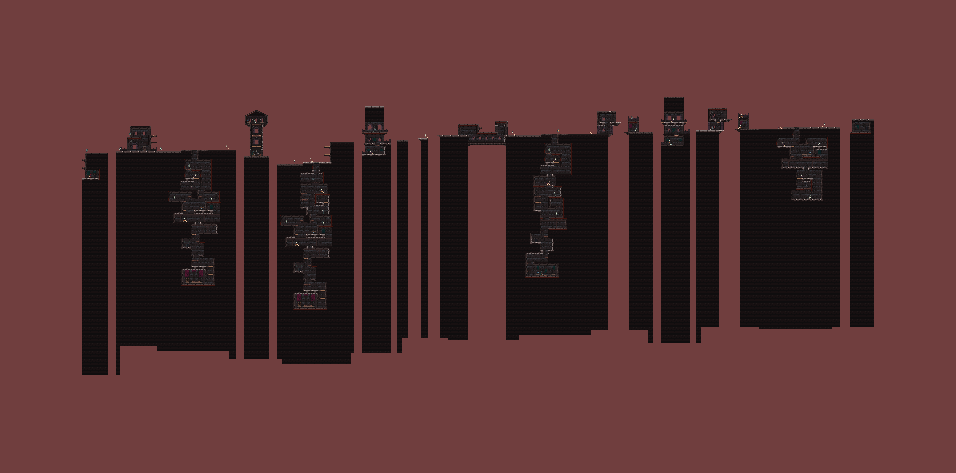
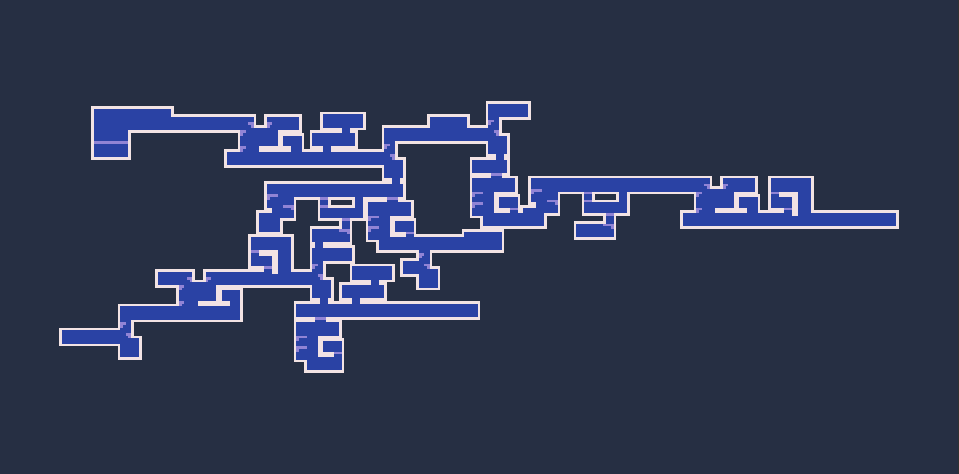
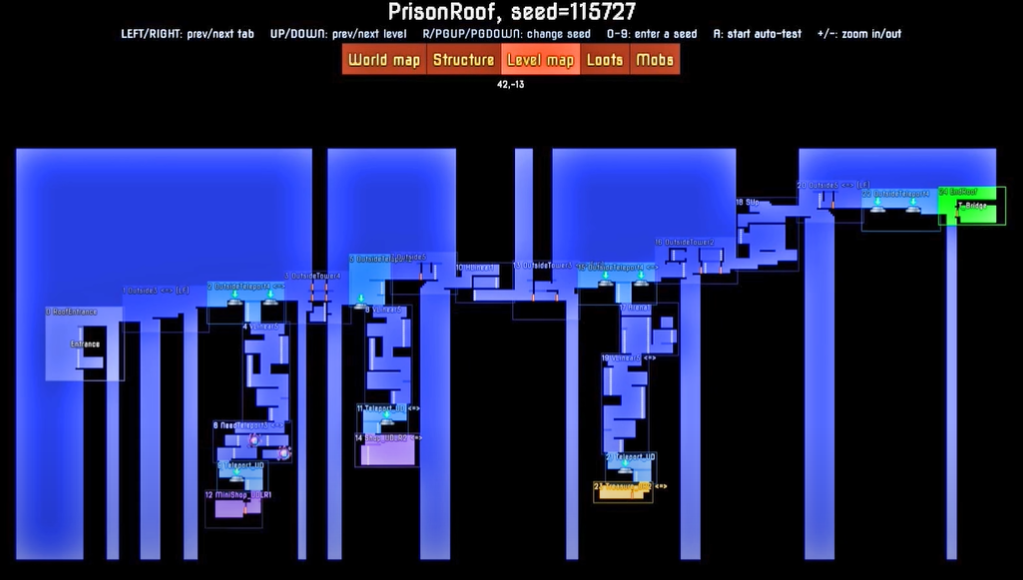
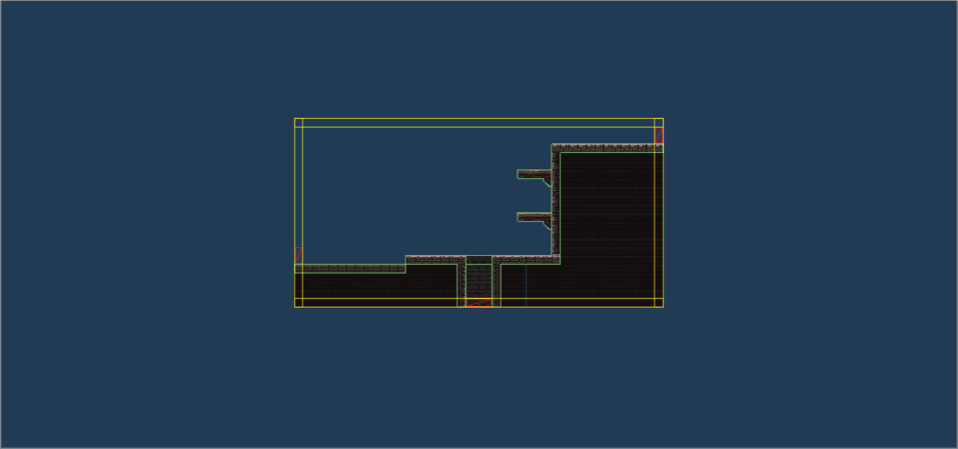
Level map#
Dead Cells comes with a schematic level map that shows the overview of the whole level with a very simple graphics. This level map also contains positions of all the teleport, treasures, etc. We decided to create something similar (although much simpler) for this tutorial. The result can be seen below:
After a level is generated, we create an additional tilemap which will contain all the information about the level map. We go through individual tilemap layers of the level and copy them to the level map tilemap. First, we find all the tiles from the Background tilemap layer and copy them to the level map. But instead of using the normal graphics of individual tiles, we use a tile that is completely blue. Then we repeat this process with other layers and different colours of tiles.
public TileBase LevelMapWallTile;public TileBase LevelMapWallBackgroundTile;public TileBase LevelMapBackgroundTile;public TileBase LevelMapPlatformTile;private void SetupLevelMap(GeneratedLevel level){// Return if level map not supportedif (!DeadCellsGameManager.Instance.LevelMapSupported()){return;}// Create new tilemap layer for the level mapvar tilemaps = level.GetSharedTilemaps();var tilemapsRoot = level.RootGameObject.transform.Find(GeneratorConstants.TilemapsRootName);var tilemapObject = new GameObject("LevelMap");tilemapObject.transform.SetParent(tilemapsRoot);tilemapObject.transform.localPosition = Vector3.zero;var tilemap = tilemapObject.AddComponent<Tilemap>();var tilemapRenderer = tilemapObject.AddComponent<TilemapRenderer>();tilemapRenderer.sortingOrder = 20;// Assign special layervar mapLayer = LayerMask.NameToLayer(DeadCellsGameManager.LevelMapLayer);tilemapObject.layer = mapLayer;// Copy background tilesCopyTilesToLevelMap(level, new [] {"Background", "Other 1"}, tilemap, LevelMapBackgroundTile);// Copy wall background tilesCopyTilesToLevelMap(level, new [] {"Background"}, tilemap, LevelMapWallBackgroundTile, x => x == WallTile);// Copy platforms tilesCopyTilesToLevelMap(level, new [] {"Platforms"}, tilemap, LevelMapPlatformTile);// Copy wall tilesCopyTilesToLevelMap(level, new [] {"Walls"}, tilemap, LevelMapWallTile);}
The last part of the setup is to create a camera the displays only the level map tilemap layer. To achieve that, we assign a special layer to the tilemap and then set the culling mask. We also added a simple camera control that reacts to players pressing a button and toggles between the default view and the level map view.
Note: For the level map to work, you need to add a layer called LevelMap. Unfortunately, it is impossible to do that from a script.
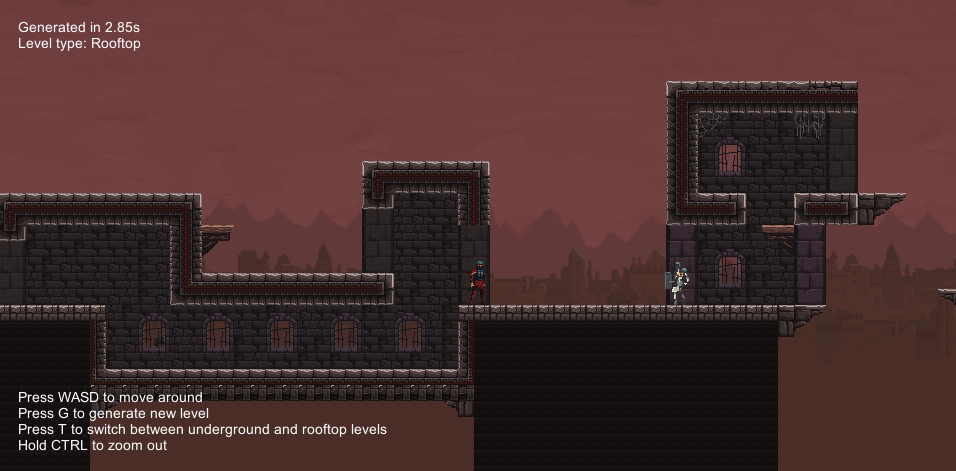
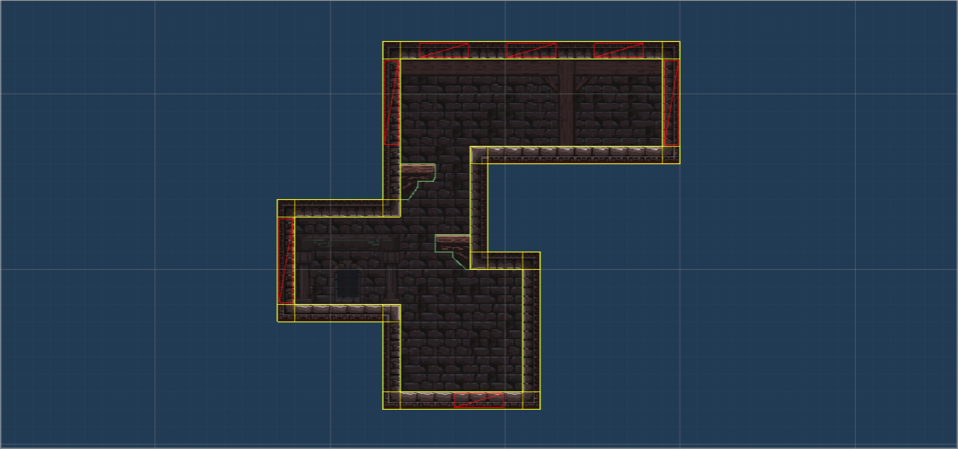
Results#

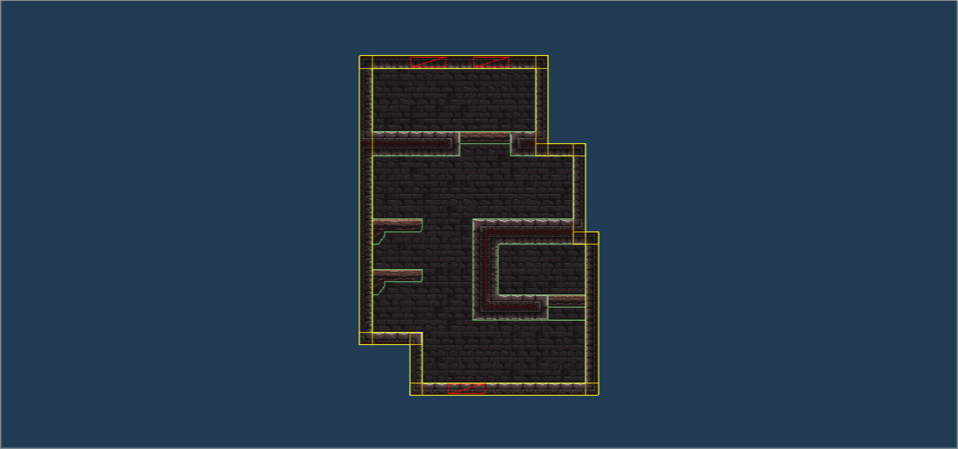
Rooftop level#
The second level that we try to implement is a little bit different. It is inspired by the Ramparts level from Dead Cells. Instead of being underground, it takes places on the ramparts of the prison. We will have to combine two types of rooms - rooms that are on the roofs of towers and rooms that are inside towers.
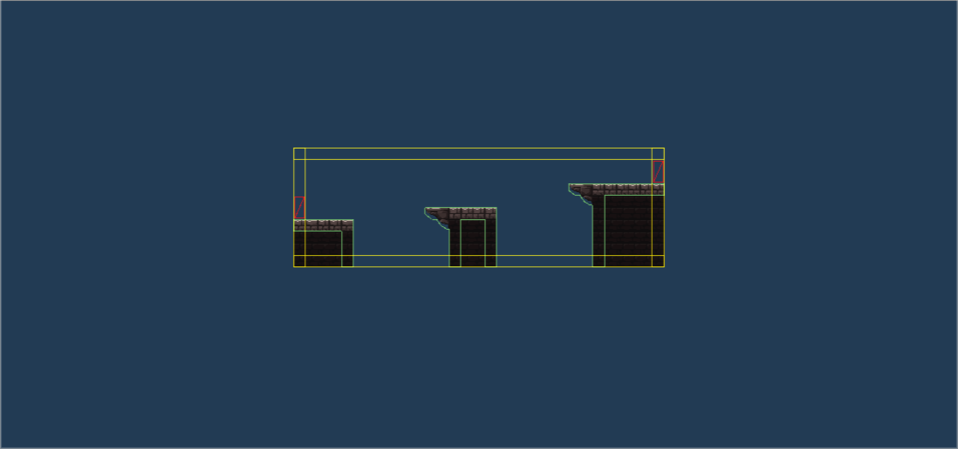
Towers#
The first challenge of this level is how to generate the top layer of rooms in a way that it looks like there are towers that are divided by gaps. Our goal si to create a set of room templates that can be connected only horizontally and then implement a post-processing logic that will create the illusion of towers.
Room templates#

Note: It is very important that we do not use layers with colliders if it is not necessary. For example, you can see that only the outline tiles of walls have a collider and other walls are in the background layer without a collider. The reason for that is that when the generator assembles the level and copies tiles to shared tilemaps, Unity has to recompute collider shapes which can significantly decrease the performance if there are too tiles with colliders.
Level graph#
The first version of the level graph contains the top layer of rooms, i.e. only the rooms that are on top of the towers.

Intermediate results#
Below we can see how the level looks now. All the rooms are connected only horizontally because there are no vertical door positions.
Walls#
The last step is to add wall tiles under individual rooms so that the level looks like there are towers. This can be done with a custom post-processing logic that goes through all the rooms and for each used room template it finds the bottom-most layer of tiles. For each tile position in this layer, if it contains a non-null tile, we add a column of wall tiles under it.
private void AddWallsUnderRoom(RoomInstance roomInstance){// Get the room template and all the used tilesvar roomTemplate = roomInstance.RoomTemplateInstance;var tilemaps = RoomTemplateUtils.GetTilemaps(roomTemplate);var usedTiles = RoomTemplatesLoader.GetUsedTiles(tilemaps).ToList();var roomTemplateWalls = tilemaps.Single(x => x.name == "Walls");// Find the minimum y coordinate of all the tiles and use it to find the bottom layer of tilesvar minY = usedTiles.Min(x => x.y);var bottomLayerTiles = usedTiles.Where(x => x.y == minY).ToList();foreach (var pos in bottomLayerTiles){var tilemap = backgroundTilemap;// Use the walls tilemap only if the collider is really needed// That means we only use it if the tile is the border tile of a towervar leftTilePos = pos + Vector3Int.left;var rightTilePos = pos + Vector3Int.right;if (roomTemplateWalls.GetTile(pos) != null && !(bottomLayerTiles.Contains(leftTilePos) && bottomLayerTiles.Contains(rightTilePos))){tilemap = wallsTilemap;}// Add tiles under this positionfor (int i = 1; i <= WallDepth; i++){var wallPosition = roomInstance.Position + pos + Vector3Int.down * i;tilemap.SetTile(wallPosition, WallTile);}}}
Note: Once again, it is very important that we use collider for as few tiles as possible. We are adding many tiles and do not want to spend too much time recomputing colliders.
One problem that we have to solve is when we should call this post-processing logic. In the next section, we will add rooms inside the towers. But if we draw walls after all the rooms are drawn, we will overwrite all the rooms that are inside the tower. We would have to do some checks to avoid that. An easier solution is to call our logic after shared tilemaps are initialized but before any rooms are drawn. That means that we first draw the walls and if there is a room occupying the same tiles, the room overwrites the walls, which is what we want. To achieve that, we use Priority callbacks and register our logic right after shared tilemaps are initialized.
public override void RegisterCallbacks(PriorityCallbacks<DungeonGeneratorPostProcessCallback> callbacks){if (AddWalls){callbacks.RegisterCallbackAfter(PostProcessPriorities.InitializeSharedTilemaps, AddWallsUnderRooms);}}
The resulting level can be seen below:

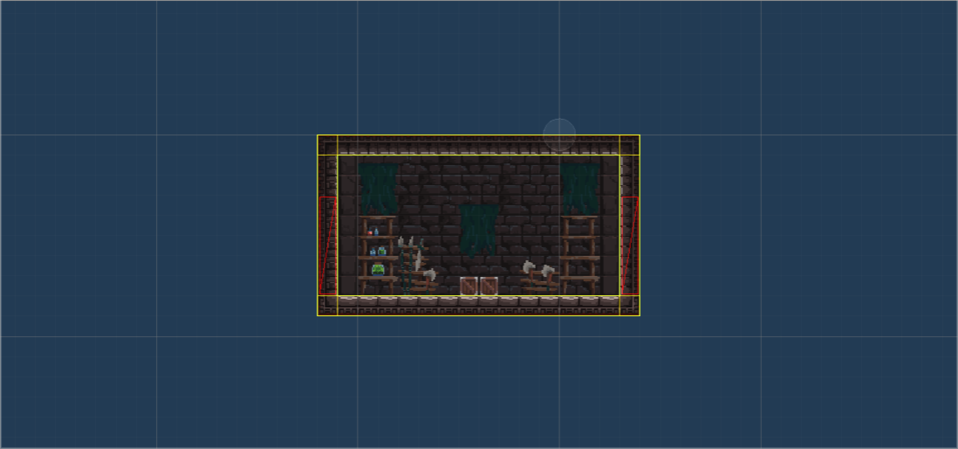
Rooms inside towers#
The second challenge is how to make sure that if we add rooms inside the towers, they will not cross the boundary of the tower. Unfortunately, it is currently not possible to add such constraints to the generator, so we have to be creative with how we design our room templates.
Room templates#
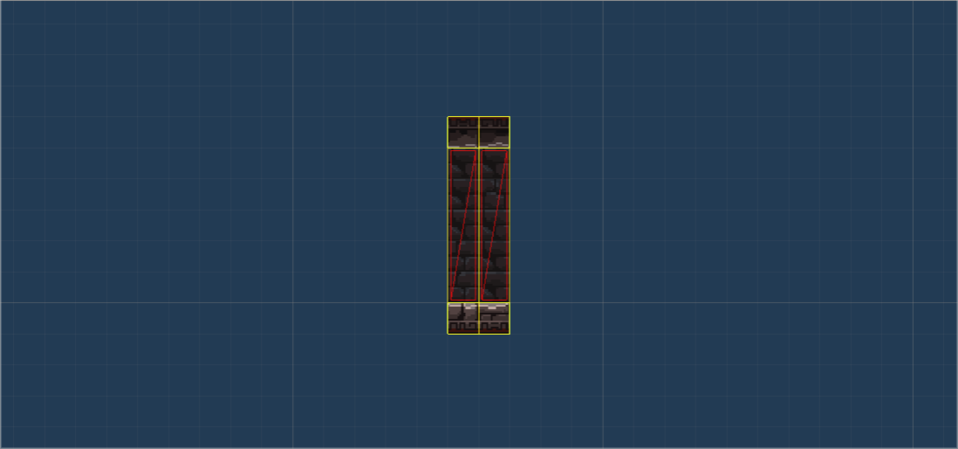
We will design our room templates in a way that it is not possible for them to cross the borders of towers. To do so, we will place all the doors near to the center of the room.
And we also have to create rooms templates that have some vertical door positions so that we can connect the inside rooms to them.

Level graph#
Now we can add these inside rooms to the level graph.
Results#