Dungeon 1
The goal of this tutorial is to show you a more realistic setup of the 3D generator. You can also see a GIF of this setup in this tweet.
Note: All files from this example can be found at Examples/Grid3D/Dungeon1.
Simple example
Models
For this tutorial, I am going to use the Modular Dungeons Pack by @Quaternius. Be sure to check them out if you like the models.
Blocks
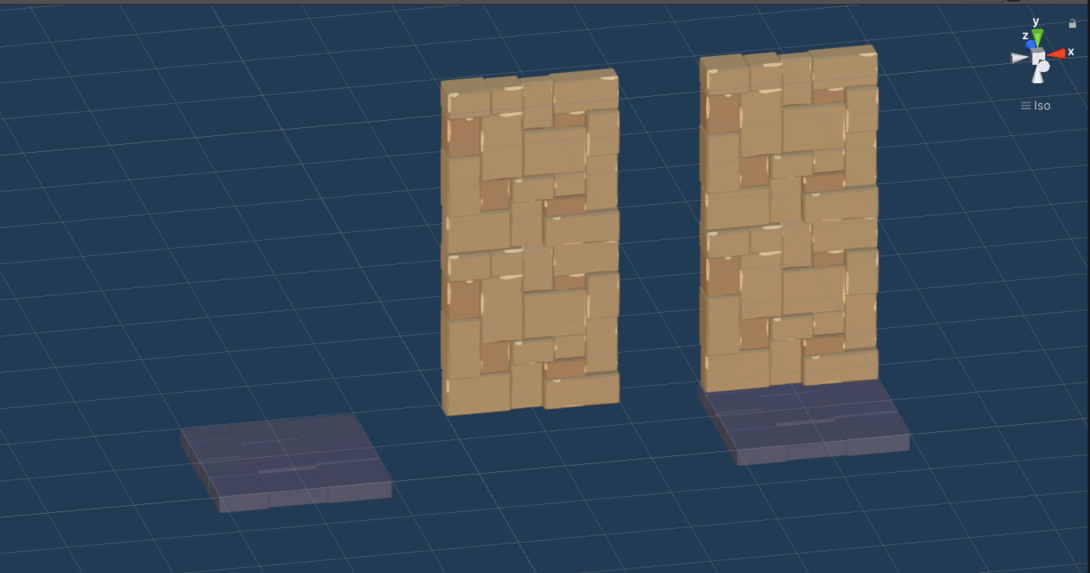
The first step that I always do is I create prefabs for the base building blocks - floors and walls. The main goal is to make sure that they interact well together and that they can be snapped to the grid easily.
Generator settings
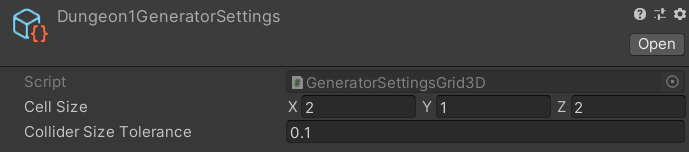
The next step is to create an instance of the GeneratorSettings scriptable object to configure the size of the grid that will be used for the level. The sizes of the floor tile model is 2x2 units, therefore, I am going to configure the grid to be 2x2 units wide.
Room template
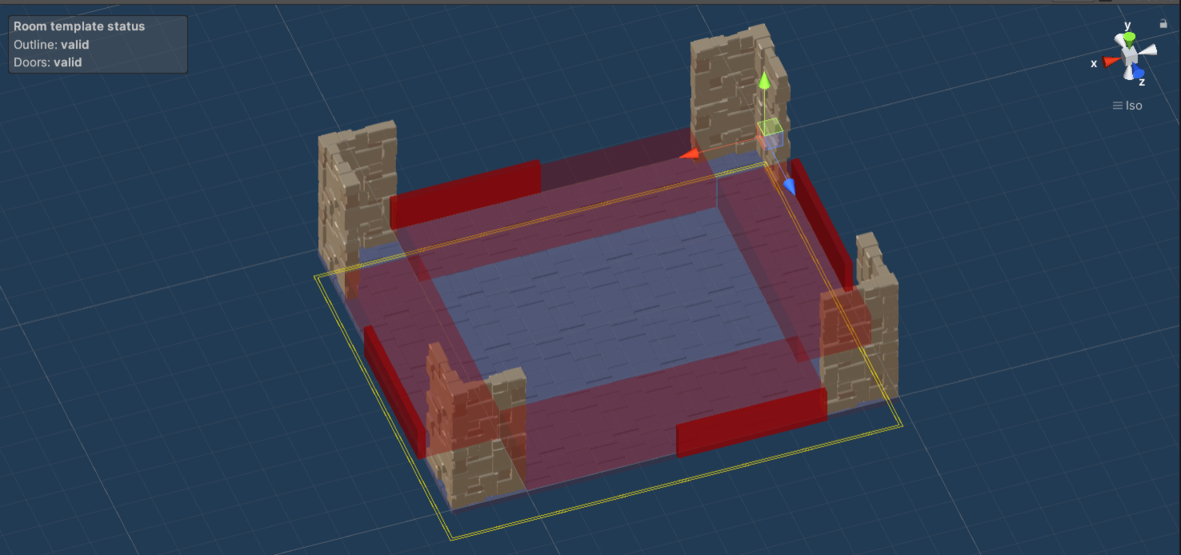
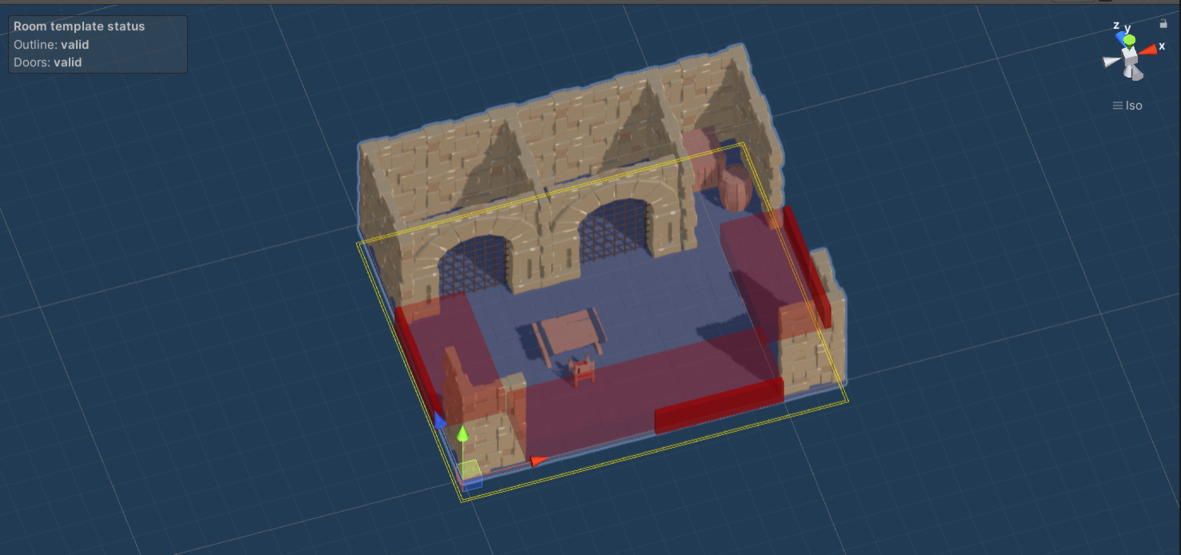
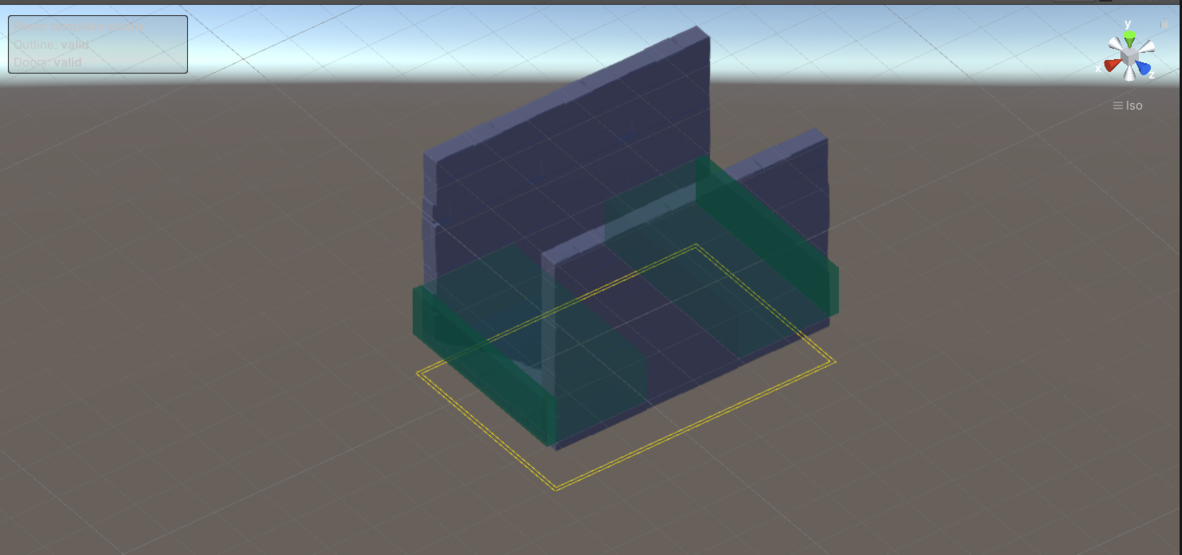
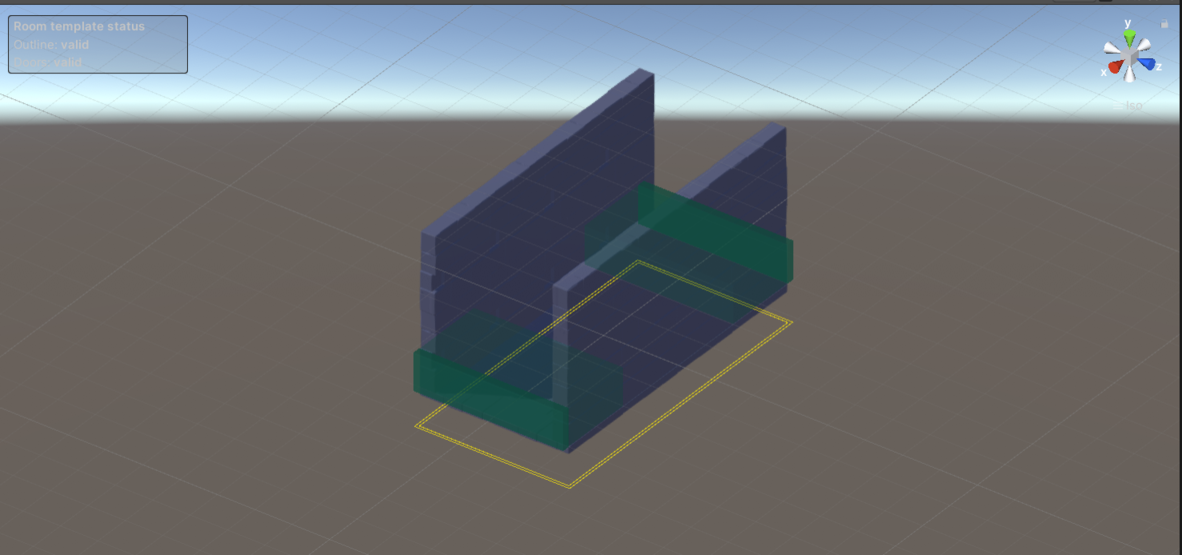
The next step is to create the first room template. I usually start with something simple to make sure that all the blocks work together.
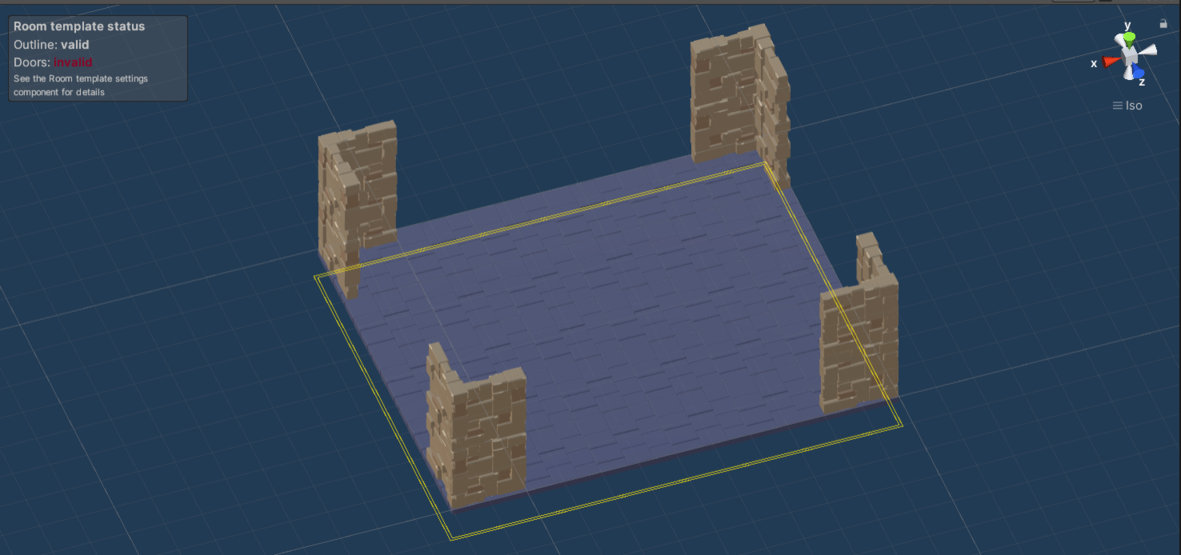
Note: The yellow outline gizmo is shown below the room template because the floor blocks are positioned with
y < 0, thus being part of another layer of tiles.
As always, make sure to leave enough holes for doors to be added in the next step.
Door prefab
The next step is to create a prefab for our doors. I am going to use the Arch model that you can see below.
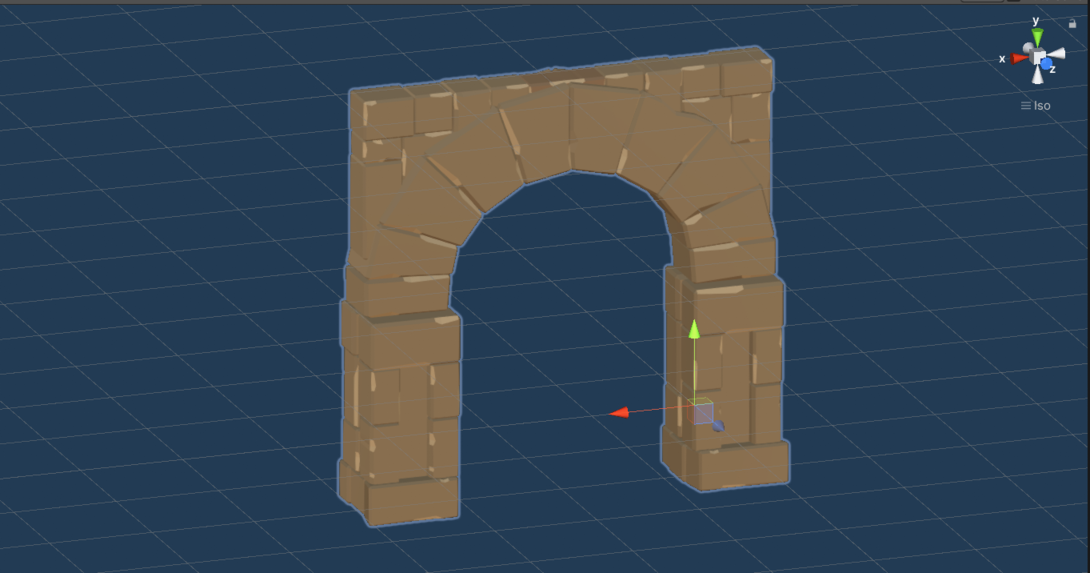
The Arch is 4 units longs which means that our door should be 2 tiles wide. Create a new door prefab (Create → Edgar (Grid3D) → Door), assign the generator settings, set the width to 2 tiles. Next, create a child game object, call it Connector and place the arch inside it. Align the arch properly. And finally, assign the Connector object to the Connectors section of the door inspector. The result should look like this: (check the Basics example if this part is too fast for you)
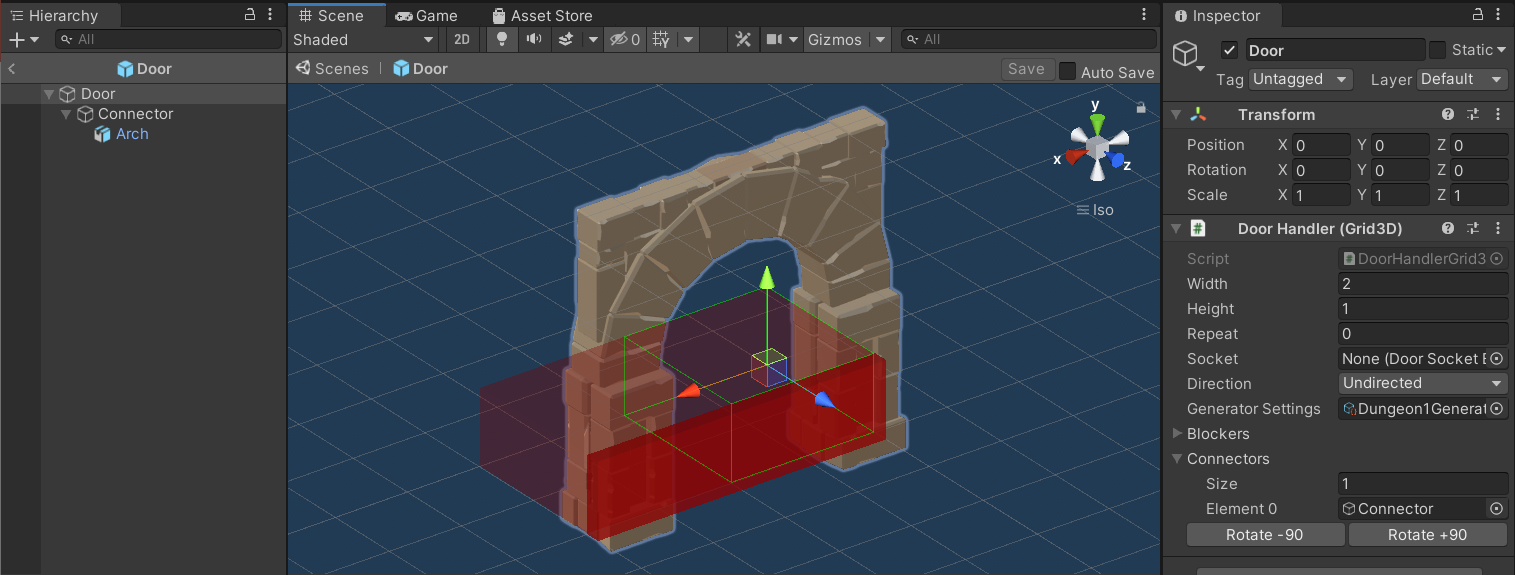
It is important to align the connector properly. This is what works for this setup:
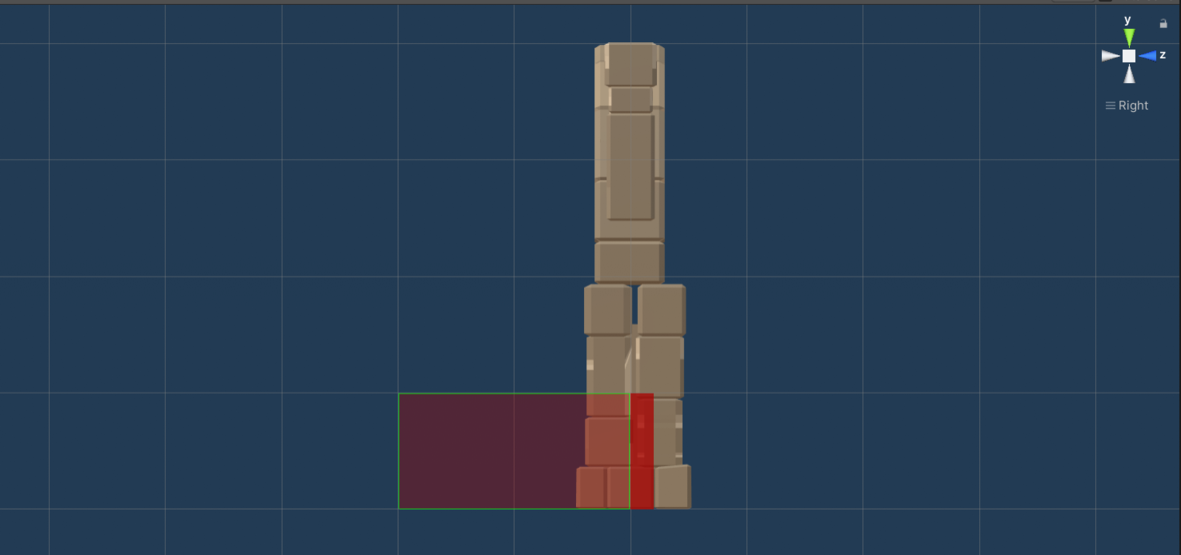

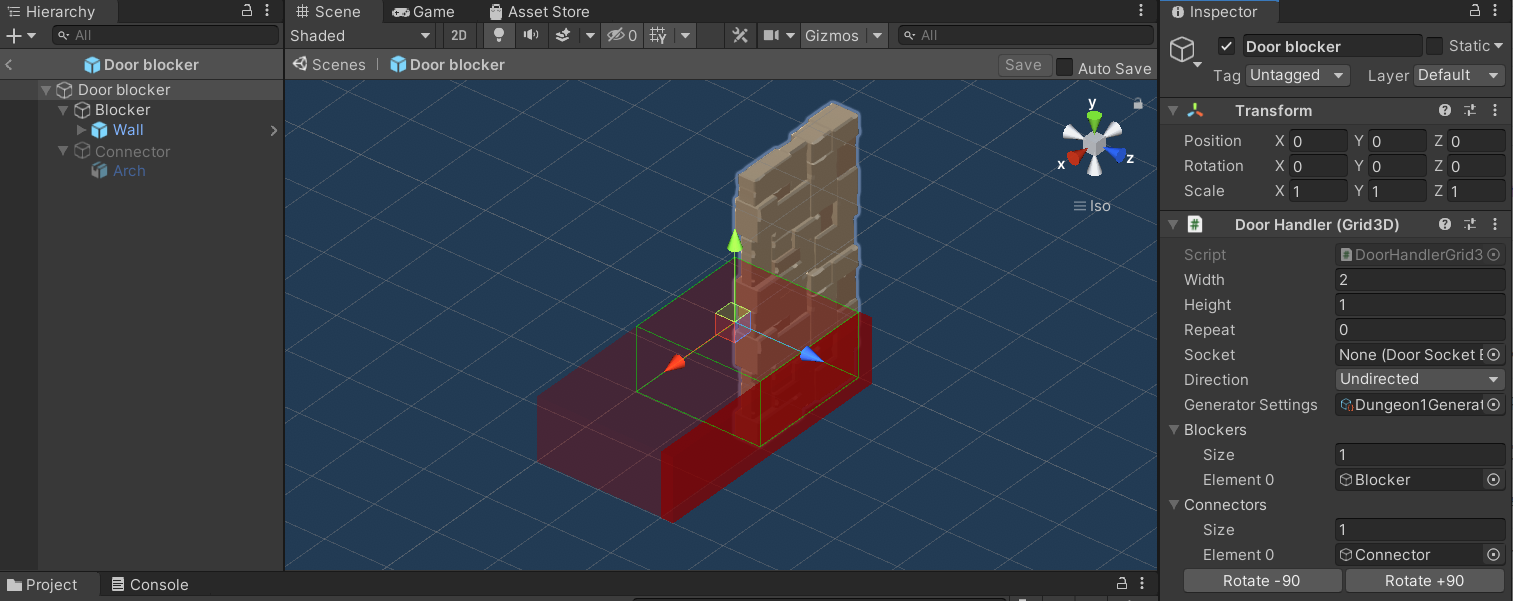
Next, it is time to add a door blocker. I am going to set up the wall block to be used when a door opening was not chosen by the generator. Make sure to align the blocker inside the green door gizmo.
Next, place the door prefab inside all the holes that we left in the room template. Make sure to adjust the Repeat parameter so that each door covers the whole hole inside the wall.
Corridor
The next step is to create a corridor. Now that we have the door prefab prepared, it is just a matter of building/designing the actual corridor and placing the doors.
Level graph
The last step in this basic setup is to create a simple level graph and use the two room templates that we created. As I mentioned previously, it is a good idea to start simple to make sure that the base setup works, any only add more complexity later.
Results
We are now ready to generate our first levels. The resulting levels are relatively simple, but there is already happening quite a lot under the hood. We can see that the door connectors are aligned properly, unused door positions are filled with door blockers, and the generator should be quite fast because the level is really simple.
Note: I know that the shadows and lightning do not make sense if it is an underground dungeon, but I think it is good enough for the purposes of this tutorial.
Real-life example
For the next part of this tutorial, I want to make the levels more realistic by adding additional room template and improving the level graph structure.
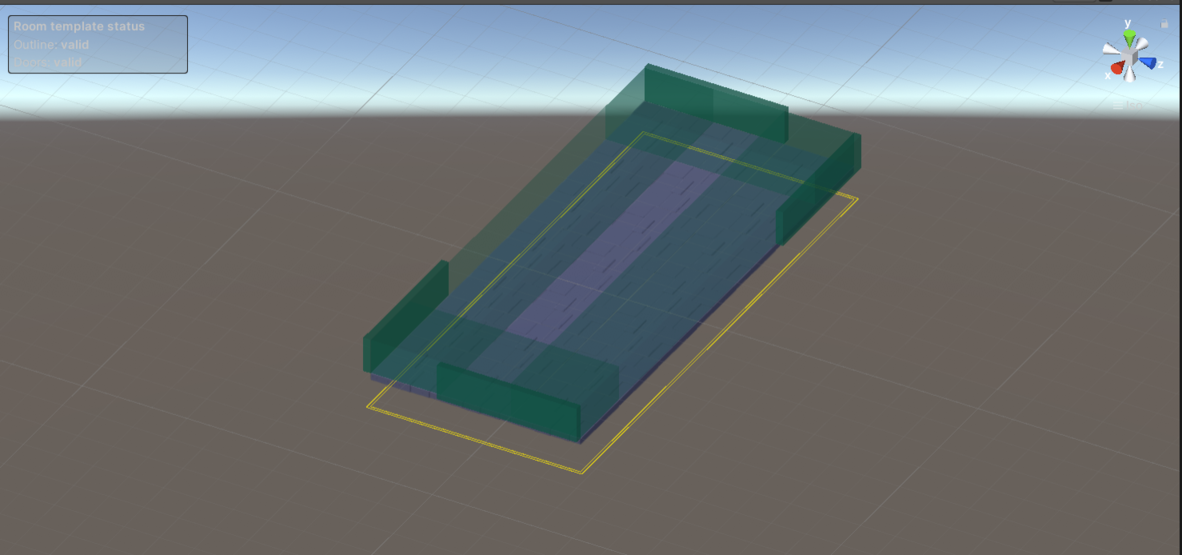
Additional room templates
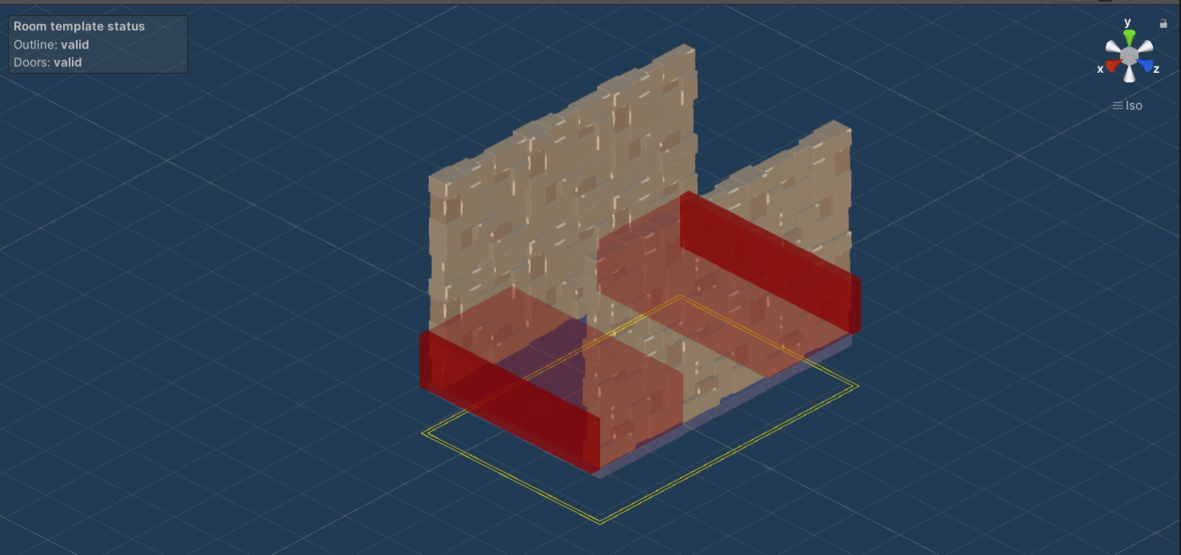
Below are some of the room templates that I created for this part of the tutorial. Note how I add door openings to all places where it makes sense, because I need the generator perform really well as I plan to increase the complexity of the level in the Extra stuff section.


Custom input setup
When working on any non-trivial level with Edgar, I recommend using Custom rooms and connection together with Custom input setup. By using these 2 features, you get much more control of the whole generator setup. For example, when working with a larger number of room templates, it is a good idea to not assign room templates to rooms directly, but rather assign a type to each room and control room templates based on that type. By doing so, you can introduce more variation to individual room types without having to configure rooms individually.
The first step is creating classes for the custom rooms and connection. You can see the code below. Once you have these classes ready, you have to open your level graph and configure it so that it uses your custom implementation. If you already have some rooms in your level graph, it is a good idea to delete all of them as they were created with the default rooms and connections implementation.
- Custom room
- Custom connection
namespace Edgar.Unity.Examples.Grid3D.Dungeon1
{
    public class Dungeon1Room : RoomBase
    {
        // Type of the room
        public RoomType Type = RoomType.Basic;

        // Enum for all types of rooms
        public enum RoomType
        {
            Basic = 0, Boss = 1, BossEntrance = 2, Social = 5,
            Entrance = 7, Cave = 8, Trap = 9, Hub = 10
        }

        // This method will not be used as we use a custom logic
        public override List<GameObject> GetRoomTemplates()
        {
            throw new System.NotImplementedException();
        }

        // Use the RoomType enum as display name
        public override string GetDisplayName()
        {
            return Type.ToString();
        }
    }
}
namespace Edgar.Unity.Examples.Grid3D.Dungeon1
{
    public class Dungeon1Connection : ConnectionBase
    {
        // Whether a corridor should be used or a direct room-to-room connection
        public bool IsCorridor = true;
    }
}
Once your custom rooms and connections are ready, you should be able to pick a room type when you configure a room in the level graph editor window.

Next, we need the logic that decides which set of room templates is used for a given room type. I use a simple switch statement here, but you can use anything you want.
namespace Edgar.Unity.Examples.Grid3D.Dungeon1
{
    [Serializable]
    public class Dungeon1RoomTemplates
    {
        public List<GameObject> Basic;
        public List<GameObject> Boss;
        public List<GameObject> BossEntrance;

        /* ... */

        public List<GameObject> Hub;

        public List<GameObject> GetRoomTemplates(Dungeon1Room.RoomType roomType)
        {
            switch (roomType)
            {
                case Dungeon1Room.RoomType.Basic:
                    return Basic;
                case Dungeon1Room.RoomType.Boss:
                    return Boss;
                case Dungeon1Room.RoomType.BossEntrance:
                    return BossEntrance;

                /* ... */

                case Dungeon1Room.RoomType.Hub:
                    return Hub;
                default:
                    throw new ArgumentOutOfRangeException(nameof(roomType), roomType, null);
            }
        }
    }
}
The last step is to put everything together and implement a custom input setup logic by creating a class that inherits from DungeonGeneratorInputBaseGrid3D. The implementation below might look intimidating, but there is not really that much going on. The main idea is that you:
- go through all the rooms in the level graph,
- cast each room to our custom room implementation type,
- compute room templates for a given room based on its type,
- and add the room to the level description which is later given to the dungeon generator.
Something similar also happens with the corridor rooms and room templates.
namespace Edgar.Unity.Examples.Grid3D.Dungeon1
{
    [CreateAssetMenu(menuName = "Edgar (Grid3D)/Examples/Dungeon 1/Input setup", fileName = "Dungeon 1 Input Setup")]
    public class Dungeon1InputSetup : DungeonGeneratorInputBaseGrid3D
    {
        public LevelGraph LevelGraph;

        public bool UseCorridors;

        public Dungeon1RoomTemplates RoomTemplates;

        protected override LevelDescriptionGrid3D GetLevelDescription()
        {
            // Make sure that level graph is not null
            if (LevelGraph == null)
            {
                throw new ConfigurationException("The LevelGraph field must not be null.");
            }

            var levelDescription = new LevelDescriptionGrid3D();

            // Setup individual rooms
            foreach (var room in LevelGraph.Rooms.Cast<Dungeon1Room>())
            {
                // Get room templates
                var roomTemplates = RoomTemplates.GetRoomTemplates(room.Type);

                if (roomTemplates.Count == 0)
                {
                    throw new ConfigurationException($"There are no room templates for the room type \"{room.Type}\".");
                }

                // Add room to the level description
                levelDescription.AddRoom(room, roomTemplates);
            }

            // Add passages/corridors
            foreach (var connection in LevelGraph.Connections.Cast<Dungeon1Connection>())
            {
                // Handle both corridor connections and direct room-to-room connections
                // This is useful for the "Extra stuff" in the tutorial
                if (UseCorridors && connection.IsCorridor)
                {
                    var corridorRoom = (RoomBase) CreateInstance<Dungeon1Room>();

                    levelDescription.AddCorridorConnection(connection, corridorRoom,
                        RoomTemplates.Corridors);
                }
                else
                {
                    levelDescription.AddConnection(connection);
                }
            }

            // Just a helper to make sure that directed graphs work properly
            InputSetupUtils.CheckIfDirected(levelDescription, LevelGraph);

            return levelDescription;
        }
    }
}
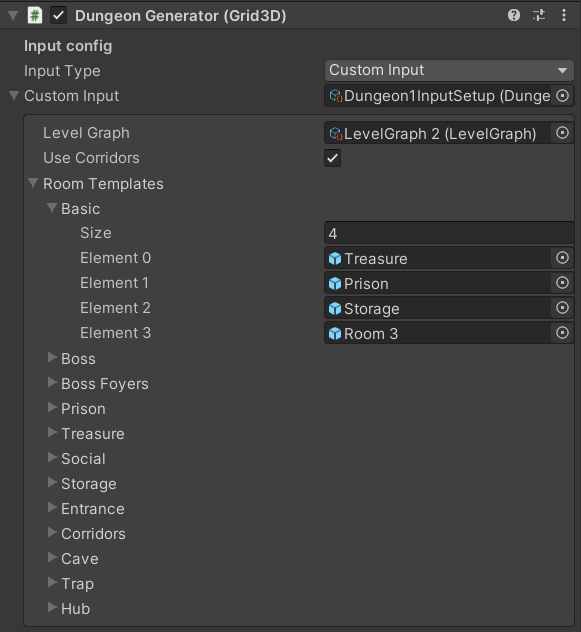
When the implementation is ready, you have to create an instance of the input setup scriptable object. Then, inside the dungeon generator component, switch input type to Custom Input and assign the scriptable object there. The result should look like this:
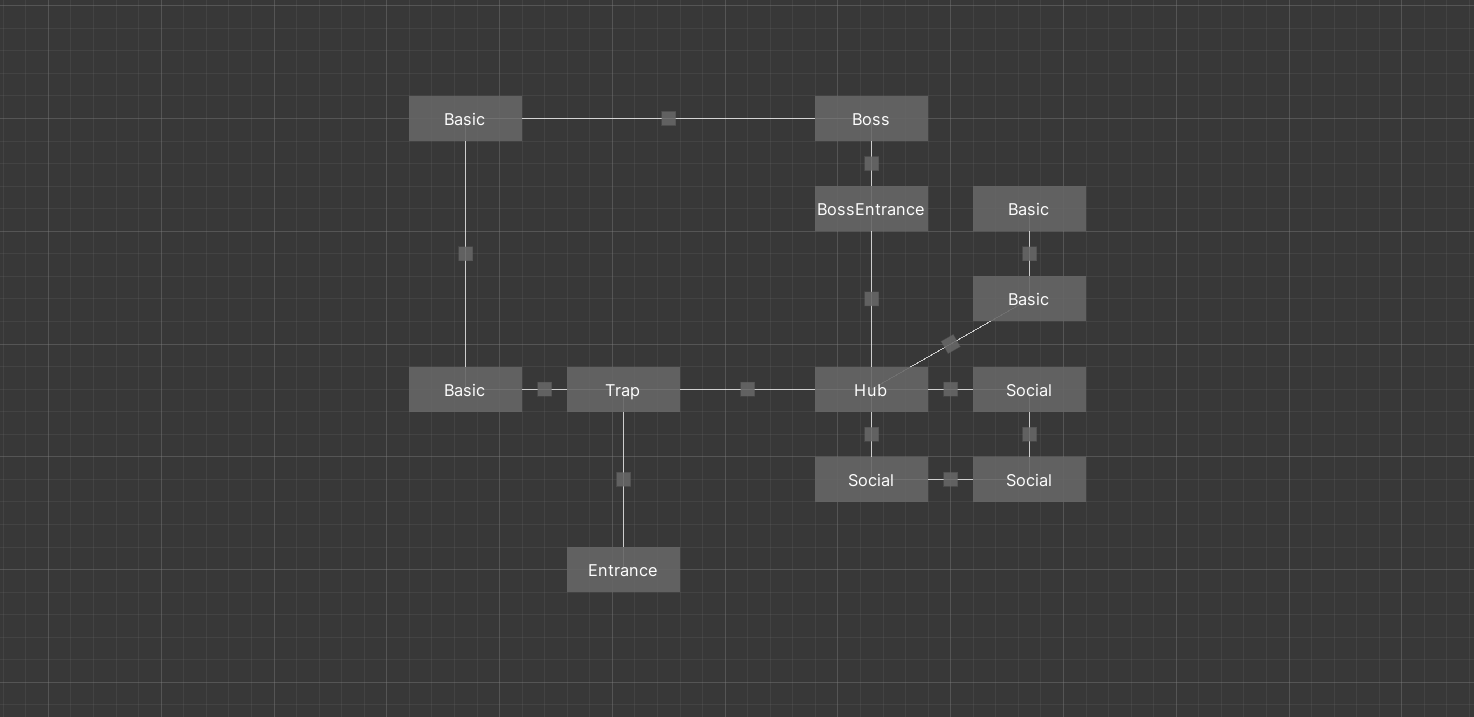
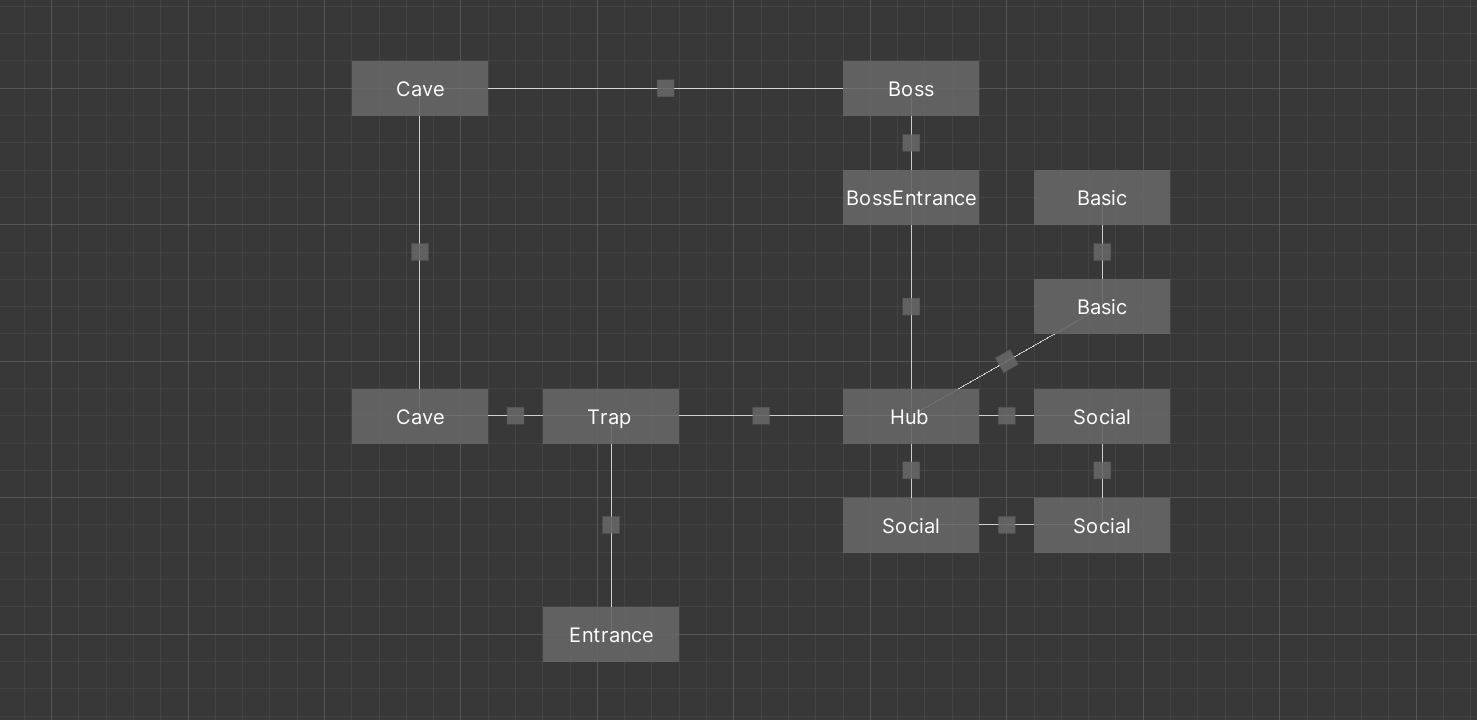
Level graph
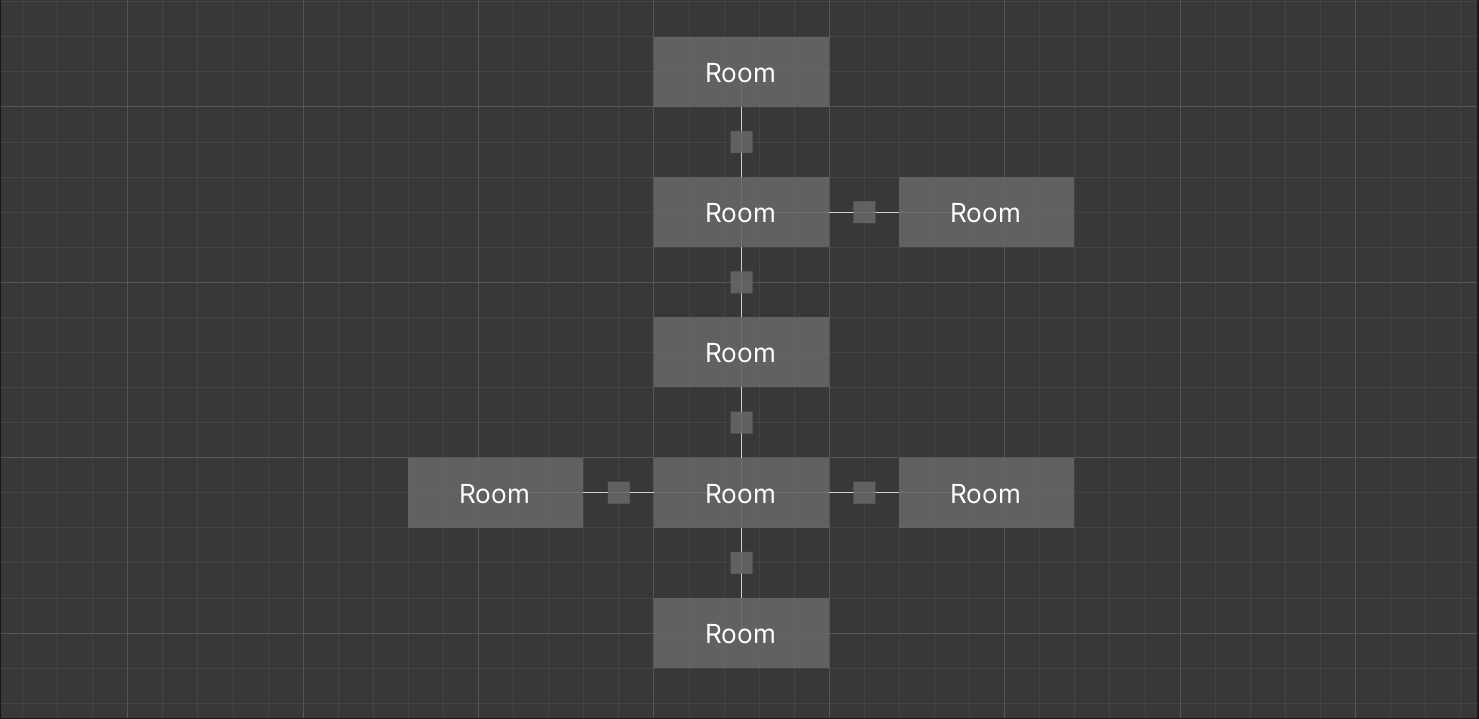
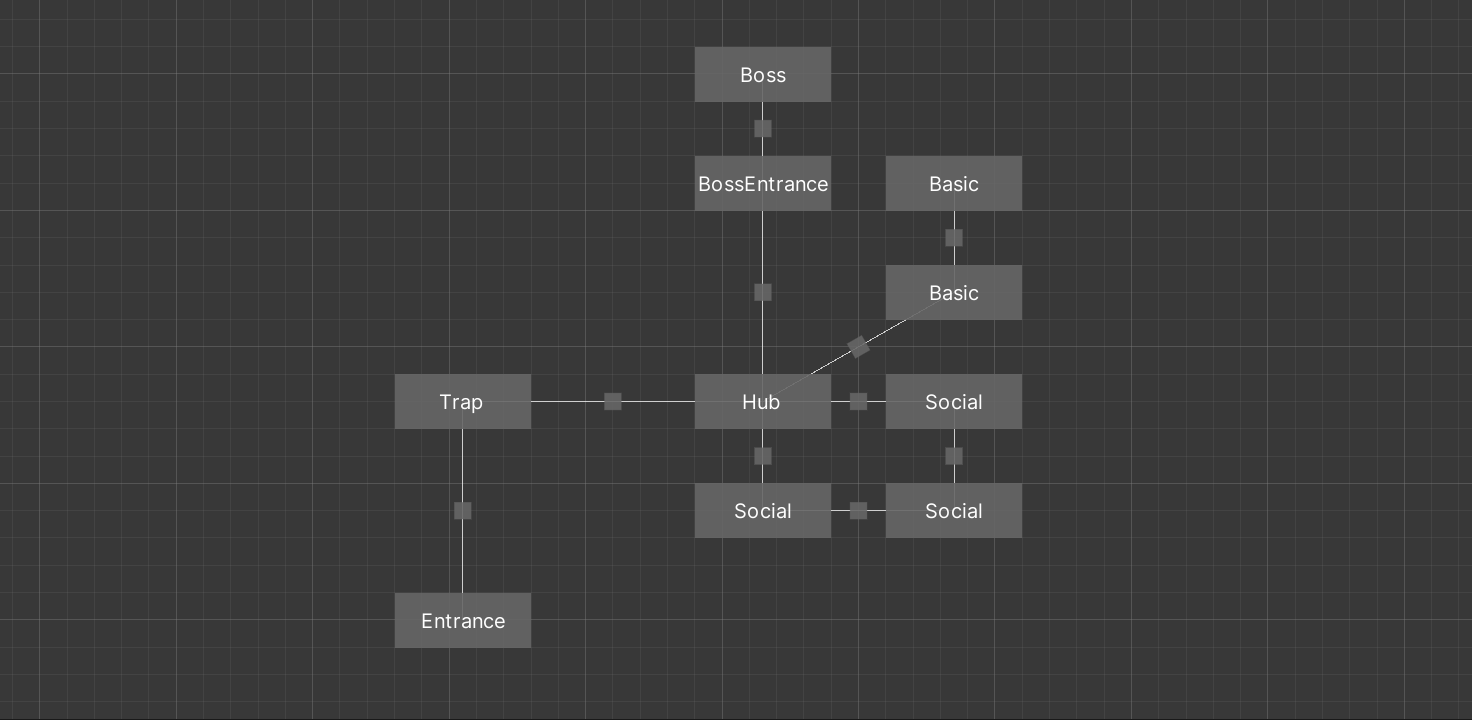
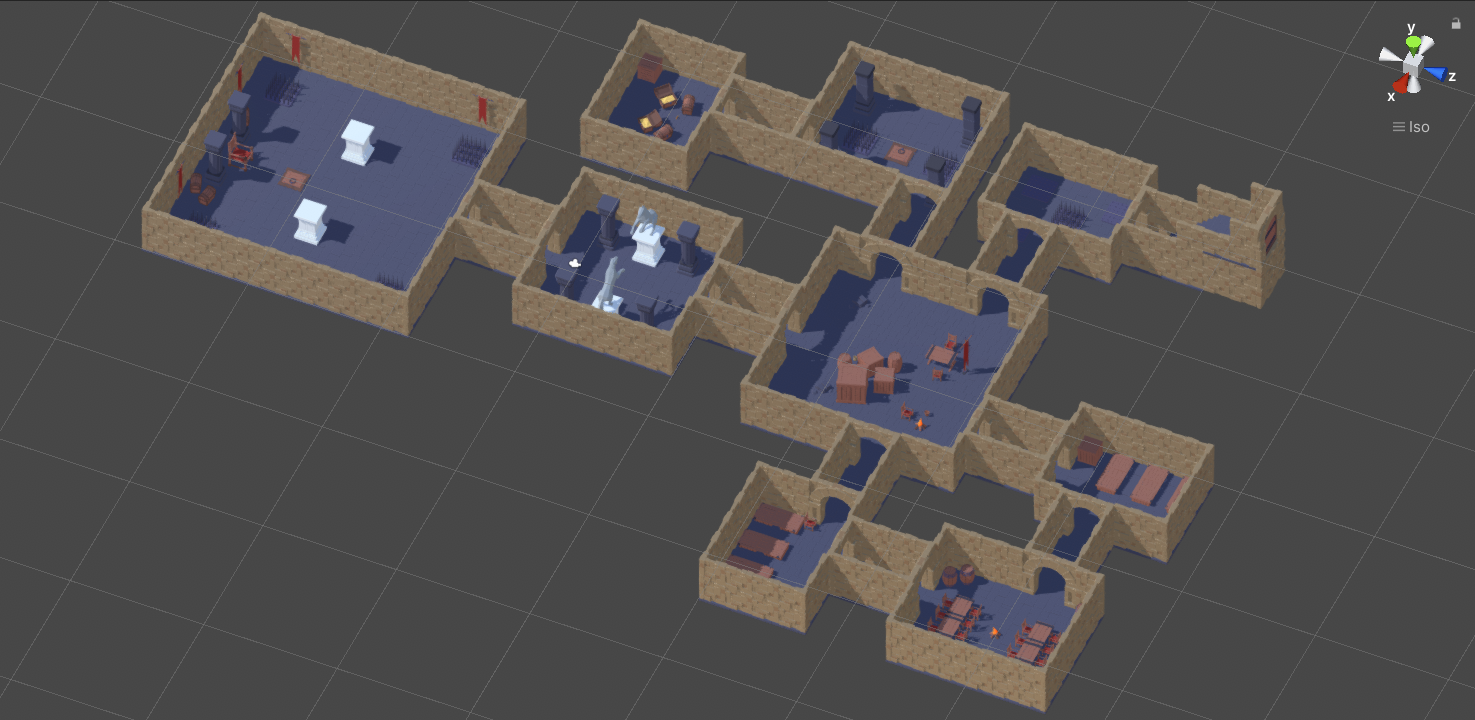
Now, we can come up with a more realistic level structure. The main idea is as follows: you enter the dungeon, have to make your way around a trap, then you arrive at a large hub with multiple exits. Two of the exists lead to social rooms like bedroom, storage or kitchen. Another exit leads to a branch which contains two rooms like treasure or prison. The last exit leads to the entrance of the boss room and then to the boss room itself, where you are going to face the bandit boss.
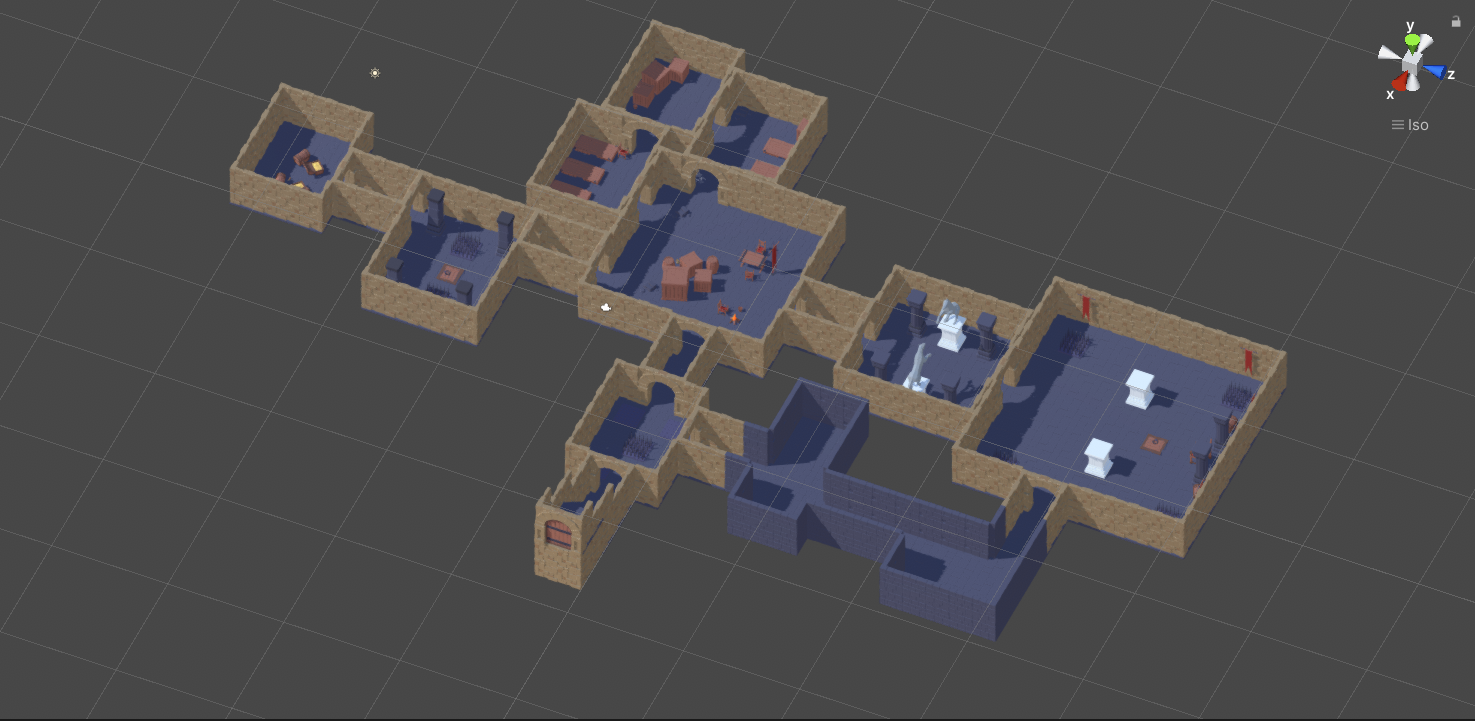
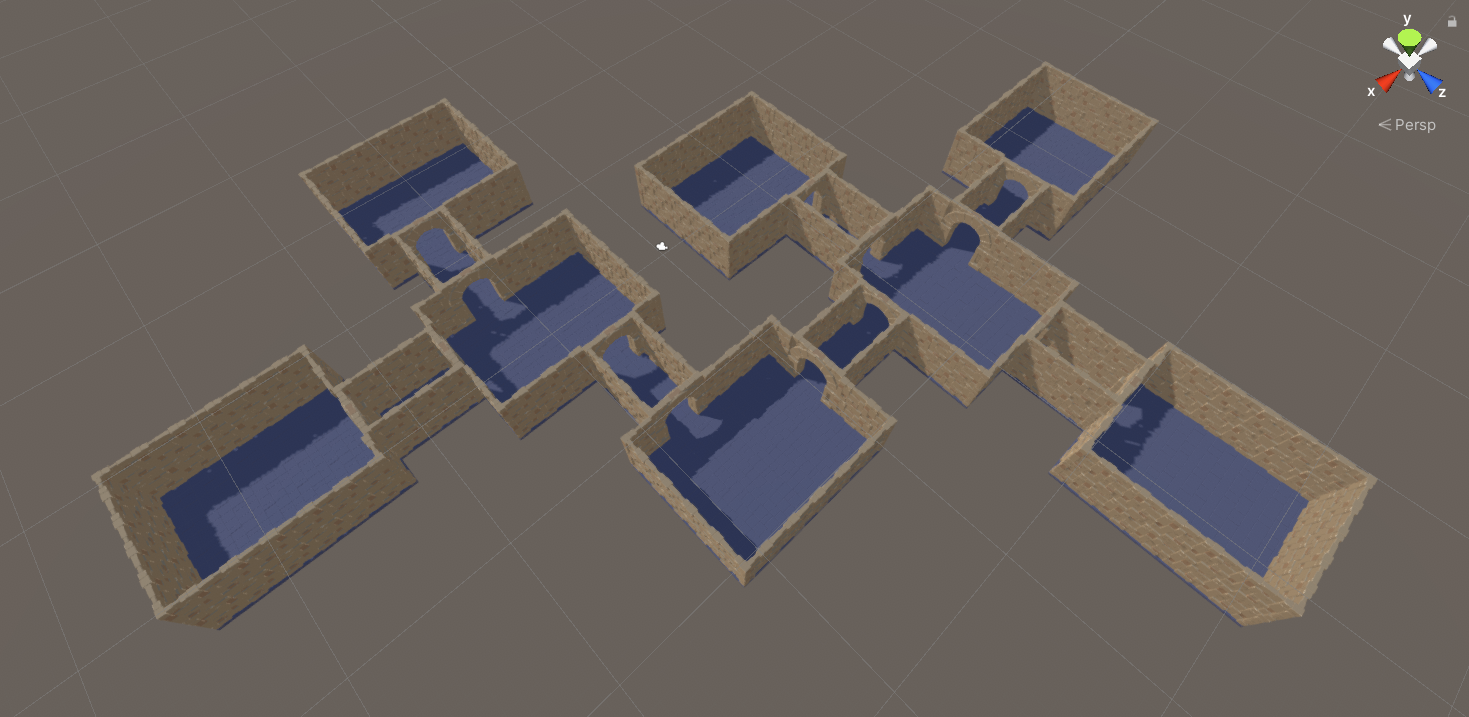
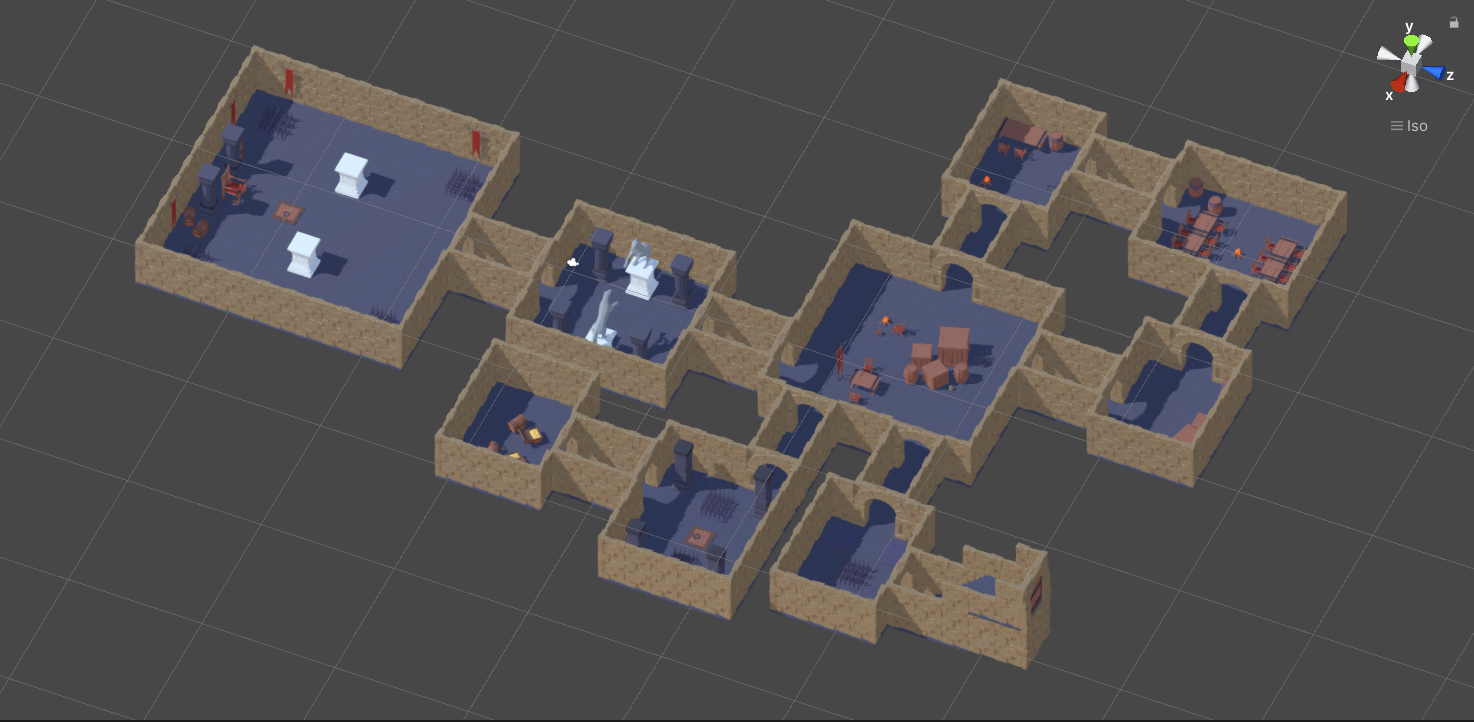
Results
The generated levels are starting to look quite nice.
Extra stuff
For this last section, I want to showcase some of the advanced stuff that you can do with the generator:
- disable corridors between some rooms
- add a Skyrim-like shortcut from the boss room back to the entrance
Disable corridors between some rooms
The default behaviour is that you either have corridors between all rooms or not have corridors at all. But if you are using custom input setup, there is no one stopping you from having corridors between some rooms and direct connections between other rooms.
Any why would you want that? For example, the boss entrance room is already something like a corridor, so why have another corridor between it and the boss room? Another example might be the area of social rooms in the level graph. I decided that I would like them better if they were closer to one another.
The setup is relatively simple because most of it was already done in the custom connection and custom input setup. In the custom connection, you just have to make sure that there is a checkbox that lets use choose if a connection should use a corridor or not.
namespace Edgar.Unity.Examples.Grid3D.Dungeon1
{
    public class Dungeon1Connection : ConnectionBase
    {
        // Whether a corridor should be used or a direct room-to-room connection
        public bool IsCorridor = true;
    }
}
And in the input setup, we need a condition that either adds a corridor or a direct connection.
// Add passages/corridors
foreach (var connection in LevelGraph.Connections.Cast<Dungeon1Connection>())
{
    // Handle both corridor connections and direct room-to-room connections
    // This is useful for the "Extra stuff" in the tutorial
    if (UseCorridors && connection.IsCorridor)
    {
        var corridorRoom = (RoomBase) CreateInstance<Dungeon1Room>();

        levelDescription.AddCorridorConnection(connection, corridorRoom,
            RoomTemplates.Corridors);
    }
    else
    {
        levelDescription.AddConnection(connection);
    }
}
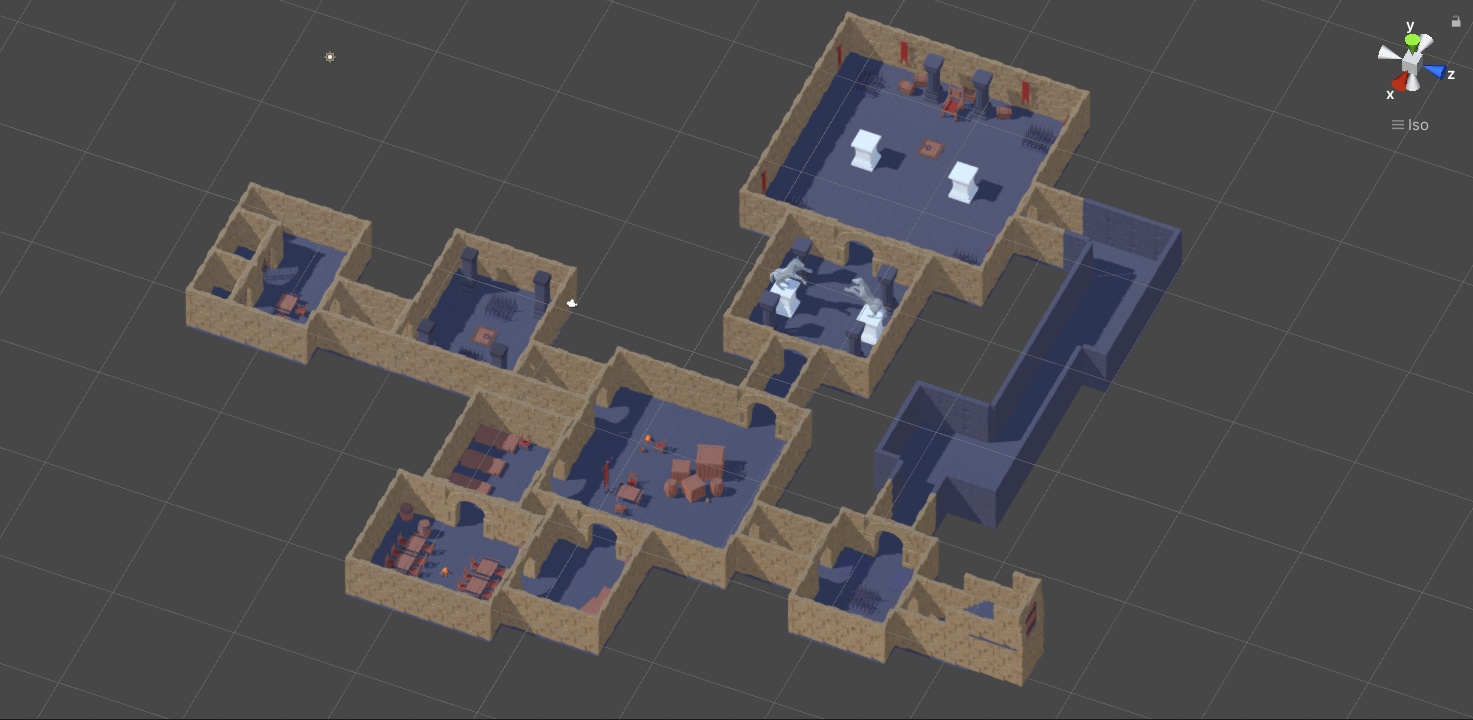
Results
In the generated level below, you can see that there are no corridors between some neighbouring rooms.
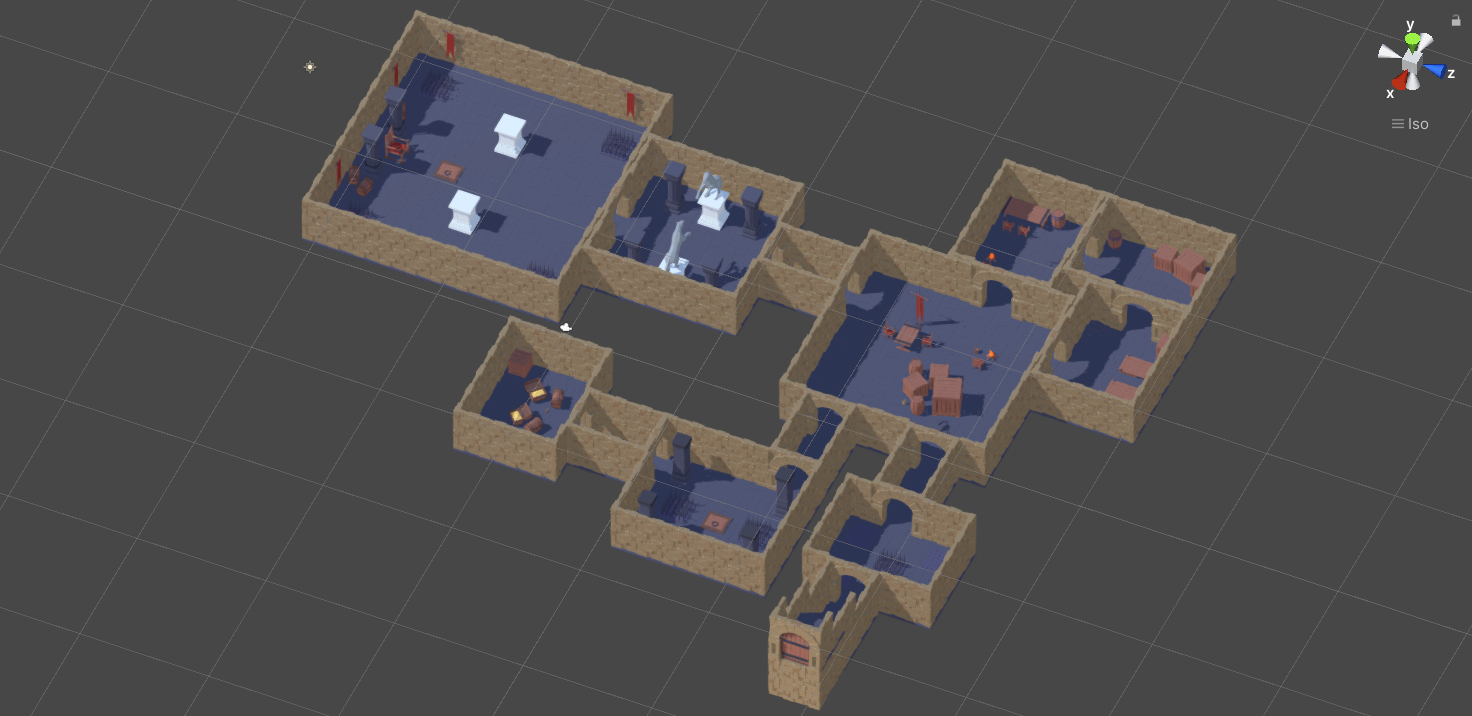
Note: When generating levels without corridors, you must make sure that it is possible to connect the rooms without the use of corridors.
Skyrim-like shortcut
The next thing I wanted to experiment with was adding a Skyrim-like shortcut that would lead from the boss room back to the entrance.
Modified Boss and Boss entrance room templates
The first step is to make sure that we can add additional exits to the Boss room while still making sure that the entrance uses the central door. To do this, I decided to create a special Boss door socket (orange colour in the screenshot below) so that the rooms connect properly.


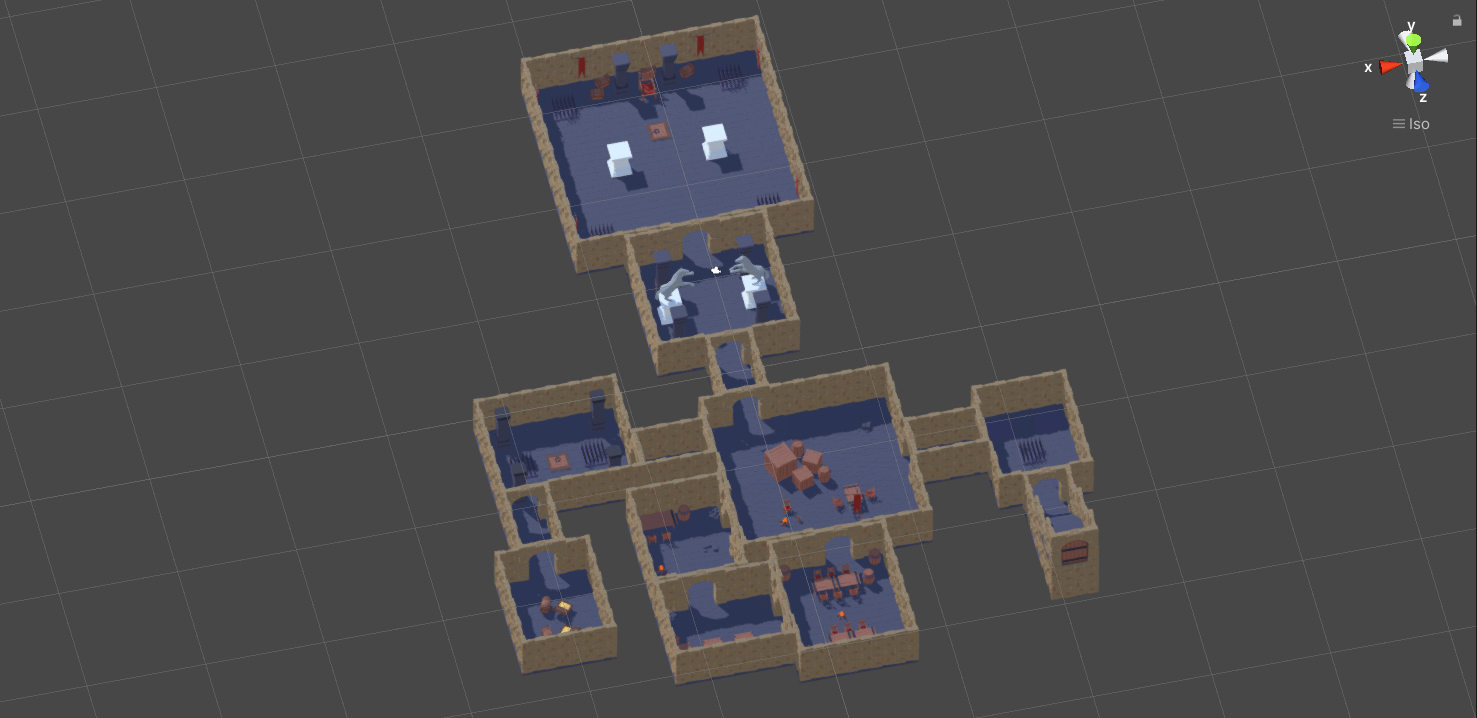
Intermediate results
Below we can see some intermediate results using this new setup with the shortcut from the Boss room. Spoiler alert: this setup does not perform very well because it is quite hard for the generator to find a suitable layout for the loop/cycle that was formed by adding the shortcut path.
Better performance and cave room templates
The intermediate results have 2 problems:
- the generator sometimes timeouts
- I want the shortcut rooms to be in a different style than the ordinary rooms
The reason why the performance is not the best is that there is not much freedom in the loop that we are trying to lay out. The loop always starts with a small trap room, then a large hub room, then boss entrance, boss room and finally the two shortcut rooms. Aside from the shortcut rooms, all the other rooms have a fixed shape - there is only a single room template for each one. One approach to improve the performance would be to add more room templates with different shapes so that the algorithm has more options. But in this tutorial, I want to show you a different approach - optimizing the shortcut rooms in order to improve the performance.
First, I created a couple of darker cave-like corridors. They are just like normal corridor, but with a single difference - they use a different door socket so that they can be only connected to other cave-like rooms. Because the corridor use different walls, you also have to create a new door prefab for them.
Next, I created cave-like room templates for normal rooms. These room template might look quite weird at first as they do not have any walls - they have doors all over the outline. There are two reasons for that:
- higher number of possible door positions improves the performance of the generator
- it fits the style of a more organic cave as it will be harder to distinguish room borders
This approach works because all the unused door positions will be filled by door blockers.

The last room template that we need is a corridor that can connect a normal room to a cave room:
Level graph
Next, the level graph has to be changed so that the new cave rooms are used. All the corridors can be put into a single pool of corridor room templates because the door sockets will make sure that the correct corridor is always used.
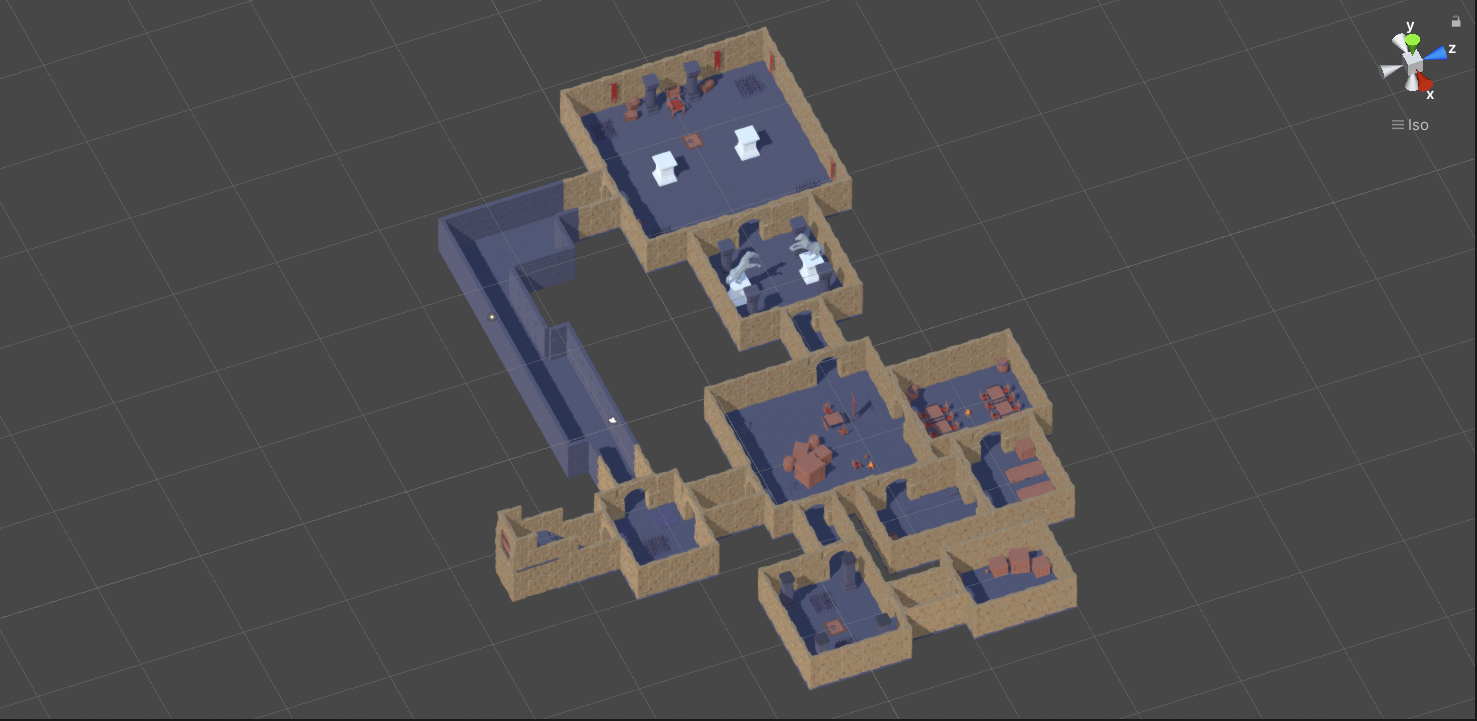
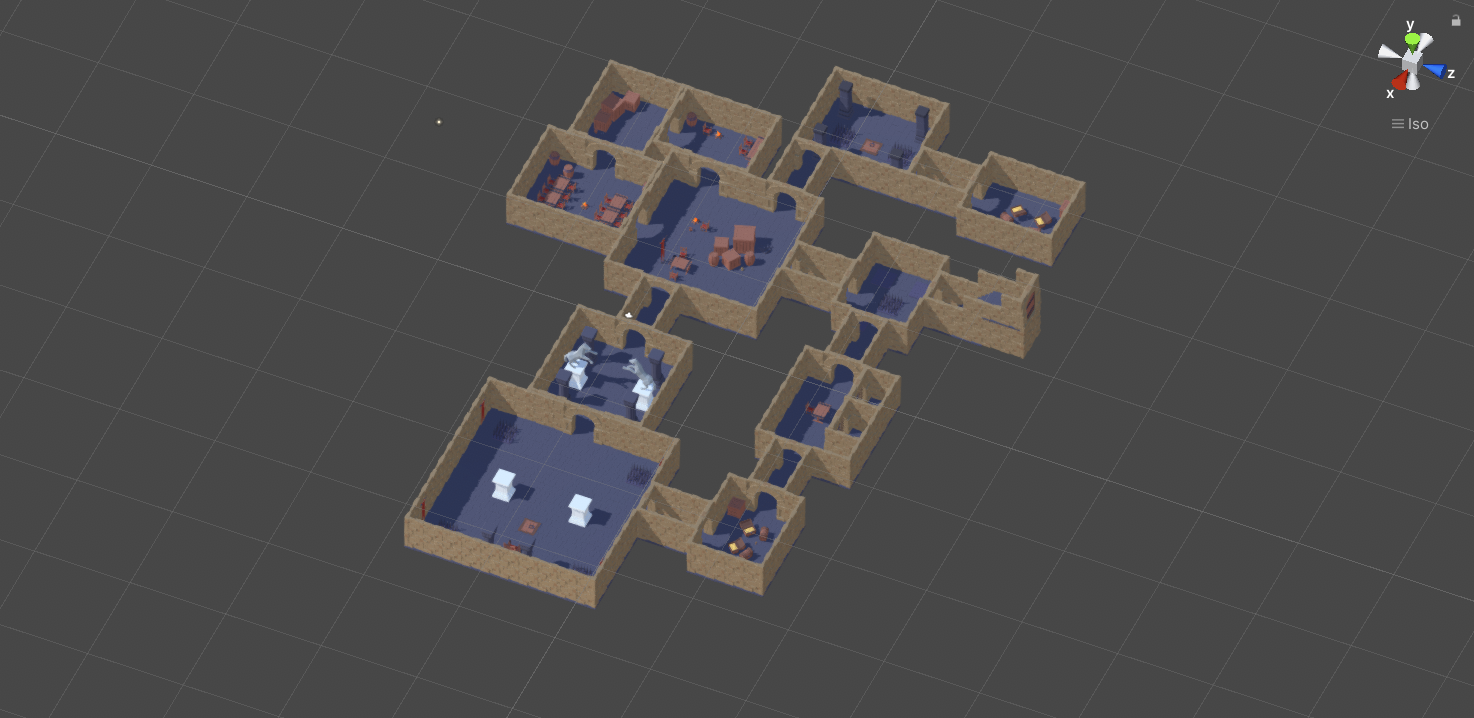
Results
You can see some final results below. The performance is now quite good, the generator is usually able to produce a level in under a second.