Post-processing
After a level is generated, we may often want to run some additional logic like spawning enemies, etc. This can be achieved by providing your own post-processing logic that will be called after the level is generated and provided with information about the level.
To better understand how the generator works, we will first describe which post-processing is done by the generator itself and then provide ways to extend this behaviour and provide your own logic.
Built-in post-processing steps#
0. Instantiate room template with correct positions#
This is not actually a post-processing as it happens in the generator stage of the whole generator and cannot be disabled. At this point, the generator knows the final position and room template for each room in the level. The generator goes through the rooms and instantiates the corresponding room template game object and moves it to its correct position. If we disabled all the other post-processing steps, we would get a bunch of correctly positioned rooms but there would often be weird overlap between the rooms.
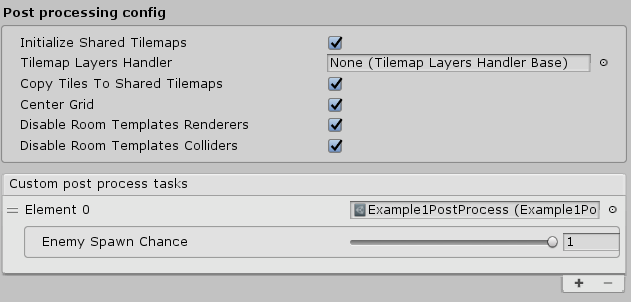
1. Initialize shared tilemaps#
In this step, the generator initializes the structure of shared tilemaps to which we will copy individual rooms in the next step. These tilemaps will contain all the tiles in the level. If you provided your own Tilemap Layers Handler, this is the time it gets called.
2. Copy rooms to shared tilemaps#
In this step, the generator copies individual rooms to shared tilemaps. If we use corridors, it is important to first copy other rooms and only then corridors. By doing so, corridors will make holes into the walls of other rooms so we can go from one room to another.
3. Center grid#
In this step, the whole level is moved in a way that its centre ends up at (0,0). This step is only used to make it easier to go through multiple generated levels without having to move the camera around.
4. Disable room template renderers#
At this point, we display both tiles from shared tilemaps and tiles from individual room template game objects that we instantiated in the step 0. Therefore, we have to disable all tilemap renderers from individual room templates.
You may think why do not we just disable the whole room template. The reason for that is that there may be some additional game objects like lights, enemies, etc. and we do not want to lose that.
5. Disable room template colliders#
The last step is very similar to the previous step. At this point, there are colliders from individual room templates that would prevent us from going from one room to another. We keep only the colliders that are set to trigger because these may be useful for example for Current room detection.
Custom post-processing#
If we want to add our own post-processing logic, we have to create a class that inherits from DungeonGeneratorPostProcessBase. And because the base class is a ScriptableObject, we need to add the CreateAssetMenu attribute so we are able to create an instance of that ScriptableObject. After a level is generated, the Run method is called and that is the place where we put our post-processing logic.
[CreateAssetMenu(menuName = "Edgar/Examples/Docs/My custom post process", fileName = "MyCustomPostProcess")]public class MyCustomPostProcess : DungeonGeneratorPostProcessBase{public override void Run(GeneratedLevel level, LevelDescription levelDescription){// Implement the logic here}}
With the implementation ready, we now have to create an instance of that ScriptableObject by right-clicking in the project view and Create -> Edgar -> Examples -> Docs -> My custom post process. And the last step is to drag and drop this ScriptableObject in the Custom post process tasks section of the dungeon generator.
| Example 1, Dead Cells | A custom post-processing task is used to spawn enemies after a level is generated |
| Dead Cells | Move the player to the spawn position of the level |