(PRO) Custom editor controls
In this guide, we will see how to override the default look of level graph editor rooms and connections in order to add custom icons.
Note: This pages is not meant to be an in-depth guide. Please look at the source code of this example for more information.
Note: All files from this example can be found at Examples/Grid2D/CustomEditorControls.
Create custom room type
Create a custom room type as documented here. I also created a RoomType enum which will control if a room has an icon next to it.
/// <summary>
/// Simple custom room to demonstrate custom editor controls.
/// </summary>
public class CustomEditorControlsRoom : RoomBase
{
    /// <summary>
    /// Each room has a type that determines the display name and icon.
    /// </summary>
    public enum RoomType
    {
        Basic,
        Treasure,
        Shop,
        Boss,
        Spawn
    }

    /// <summary>
    /// Type of the room.
    /// </summary>
    public RoomType Type = RoomType.Basic;

    public override List<GameObject> GetRoomTemplates()
    {
        // Not implemented in this example
        throw new System.NotImplementedException();
    }

    public override string GetDisplayName()
    {
        return Type.ToString();
    }

    /* ... */
}
Create custom room control
Create a class that will override the default look of rooms in the level graph editor. First, create a class that inherits from RoomControl. Then, add the CustomRoomControl attribute and specify for which room should the custom control be used.
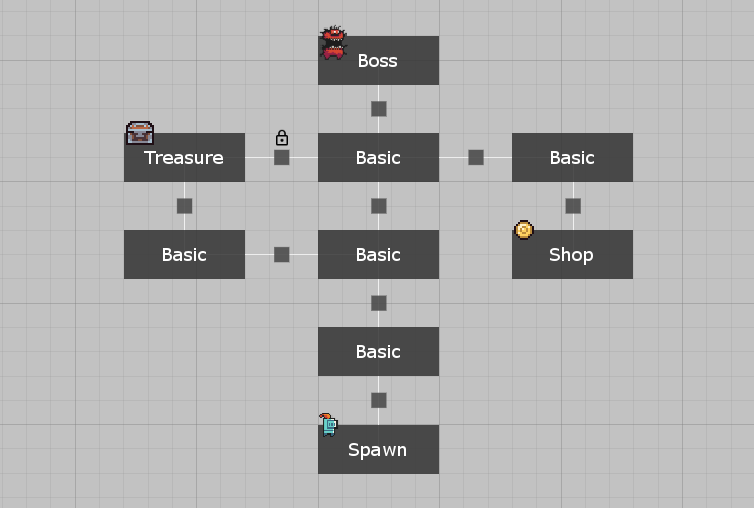
After that, you can override the default implementation of the RoomControl class. In this example, I extended the default implementation with a logic that checks the type of the room and displays an icon if there is any assigned to that room type. You can find more details in the source code.
/// <summary>
/// Simple example of a custom editor control for the CustomEditorControlsRoom room type.
/// </summary>
[CustomRoomControl(typeof(CustomEditorControlsRoom))]
private class Control : RoomControl
{
    /// <summary>
    /// Mapping from room types to icon textures.
    /// </summary>
    private static readonly Dictionary<RoomType, Texture2D> RoomTypeIcons;

    static Control()
    {
        // Initialize icons in the static constructor
        RoomTypeIcons = new Dictionary<RoomType, Texture2D>()
        {
            {RoomType.Treasure, CustomEditorControlsIcons.Base64ToTexture(CustomEditorControlsIcons.TreasureIcon, FilterMode.Point)},
            {RoomType.Shop, CustomEditorControlsIcons.Base64ToTexture(CustomEditorControlsIcons.ShopIcon, FilterMode.Point)},
            {RoomType.Boss, CustomEditorControlsIcons.Base64ToTexture(CustomEditorControlsIcons.BossIcon, FilterMode.Point)},
            {RoomType.Spawn, CustomEditorControlsIcons.Base64ToTexture(CustomEditorControlsIcons.SpawnIcon, FilterMode.Point)},
        };
    }

    /// <summary>
    /// Override the Draw method to draw a custom control.
    /// </summary>
    public override void Draw(Vector2 gridOffset, float zoom)
    {
        // Draw the base control
        base.Draw(gridOffset, zoom);

        // Make sure that we work with the correct room type
        var room = Room as CustomEditorControlsRoom;
        if (room == null)
        {
            return;
        }

        // If we have an icon for the current room type, we will draw it
        if (RoomTypeIcons.TryGetValue(room.Type, out var icon))
        {
            // Use the default control rect as a base for position and size of icon
            var rect = GetRect(gridOffset, zoom);
            rect.y -= rect.height / 4;
            rect.height /= 2;

            // Make the icon larger if it is the boss room
            if (room.Type == RoomType.Boss)
            {
                rect.height *= 1.5f;
            }

            // Compute correct rect width
            var textureRatio = icon.width / (float) icon.height;
            rect.width = rect.height * textureRatio;

            // Draw the icon
            GUI.DrawTexture(rect, icon);
        }
    }
}
Custom connections and connection editors
The process of creating custom connection editors is exactly the same as for rooms. Just replace the word room with connection in class names.